

Introduction
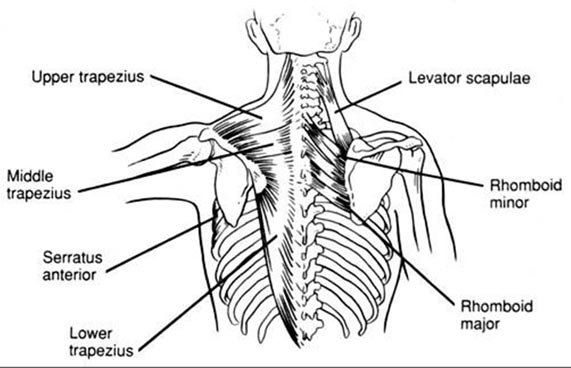
A row is a pull-type, compound exercise which works primarily your middle back, but also works your Latissimus and muscles in your arms. The following table lists information about the muscles that you use when performing bent-over barbell rows, as shown in Figures 1-2.
The following table lists information about Bent-Over Barbell Rows and the muscles that you use when performing Bent-Over Barbell Rows.
Basic Exercise Data For Bent-Over Barbell Rows:
| Resistance: | Barbell + Weight | 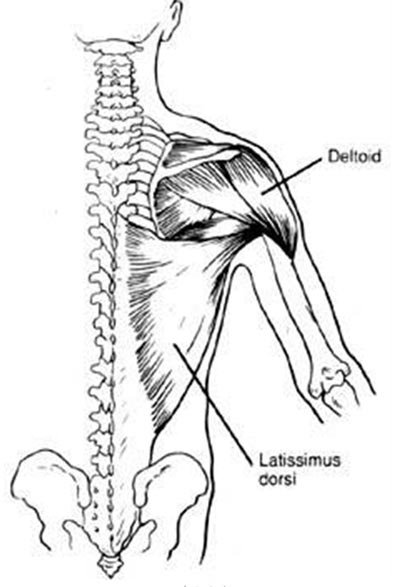  Click To Enlarge
|
| Mechanics Type: | Compound | |
| Force Type: | Pull | |
| Targeted Muscles: | Middle Back | |
| Synergists: | Trapezius (middle, lower) Rhomboids Latissimus Dorsi Teres Major Teres Minor Deltoid (posterior) Infraspinatus Brachialis Brachioradialis Pectoralis (major, sternal) |
|
| Dynamic Stabilizers: | Biceps Triceps (long head) |
|
| Stabilizers: | Erector Spinae Hamstrings Gluteus Maximus Adductor Magnus |
 Learn More About The Anatomy Of Muscles Here.
Variations Of Rows: Bent-Over Barbell Rows
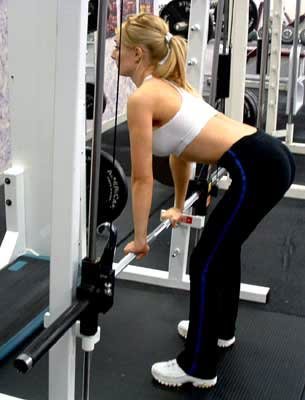
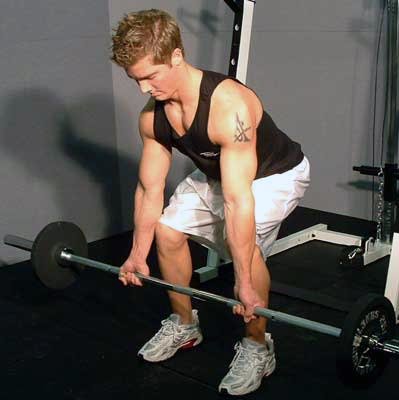
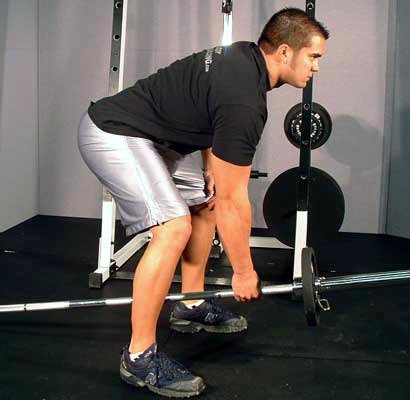
A popular variation of rows is a bent-over barbell row, which is shown in Figures 1-2. You can perform bent-over rows by loading up a barbell with the desired amount of weight, grasping the bar with an overhand grip and about a shoulder-width space between your hands, and assuming a shoulder-width stance while holding the barbell at arm's length.
While keeping your head up and back straight, bend over until the barbell is positioned below your knees, as shown in Figure 1. Note that many lifters prefer to lower the bar until their backs are nearly parallel with the floor.
The best recommendation, however, is to the lower the bar as low as is comfortable--you don't want to strain your lower back! Moreover, it's a good idea to keep your legs slightly bent throughout the lift.
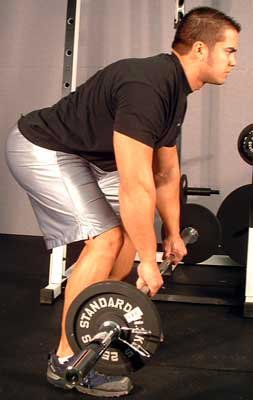
Left (Figure 1): Initial Position
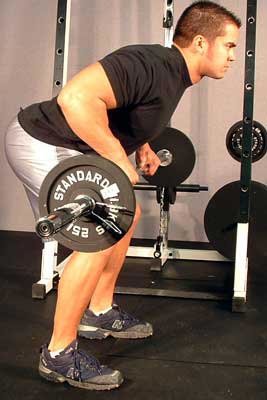
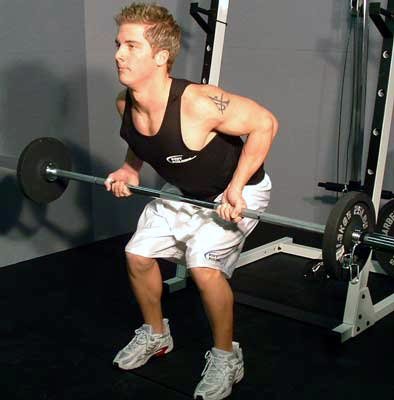
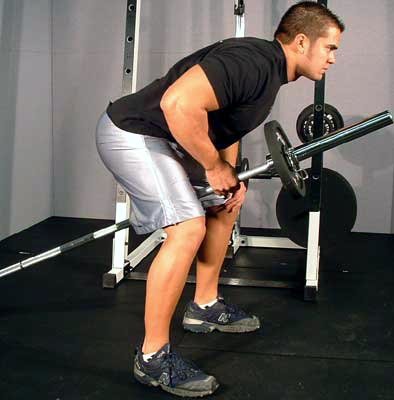
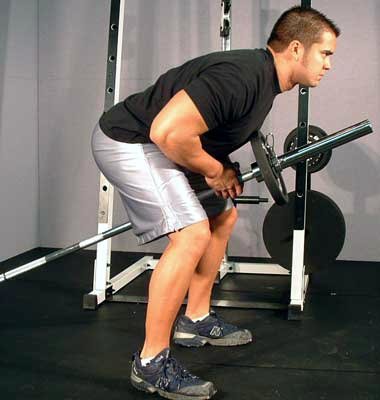
Right (Figure 2): Final Position
Squeeze your shoulder-blades together momentarily before lowering the bar to the position shown in Figure 1. Concentrate on not using your arms to lift the bar. You can imagine that your lower arms are just a couple of hooks attached to your upper arms; this can help you avoid using momentum and/or swing to lift the weight.
Variations Of Rows: Smith Machine Bent-Over Row
Another way to perform bent-over rows is by using a Smith Machine, as shown in Figures 3-4. Performing Smith Machine bent-over rows is identical to performing bent-over barbell rows, except that with the Smith Machine the barbell rides along vertical rails mounted on the rack and has safety locks. Using safety locks and having the barbell secured to the rails makes Smith Machine rows safer than regular barbell rows.
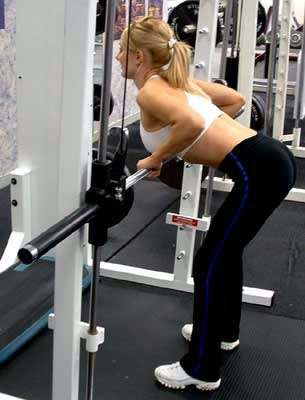
Left (Figure 3): Initial Position
Right (Figure 4): Final Position
Variations Of Rows: Reverse Grip Bent-Over Rows
Reversing your grip, as shown in Figures 5-6, is one way to emphasize your biceps during bent-over rows. Performing a reverse grip bent-over row is nearly identical to performing regular bent-over rows, with the exception that you use an underhand grip (i.e., palms facing upward).
To perform reverse grip bent-over rows, load up the barbell with the desired amount of weight, grasp the bar with an underhand grip that's slightly wider than shoulder-width, and assume a shoulder-width stance while holding the barbell at arm's length. While keeping your head up and back straight, bend over until the barbell is positioned below your knees, as shown in Figure 5. Be sure to keep your legs slightly bent throughout the lift.
Left (Figure 5): Initial Position
Right (Figure 6): Final Position
While holding the stance shown in Figure 5, focus on your middle back and lats as you pull the bar up toward your stomach, as shown in Figure 6. Squeeze your shoulder-blades together momentarily before lowering the bar to the position shown in Figure 5. Also, as mentioned above, concentrate on not using your arms to lift the bar; avoid using momentum and swing to lift the weight.
Variations Of Rows: Bent Over One-Arm Long Bar Row
Thus far, we've been discussing variations of bent-over rows where you grasp a barbell that's in front of your body. Another way to satisfy your rowing needs, however, is to perform "bent-over one-arm long-bar rows," as shown in Figures 7-8.
To do these, load up one end of a long barbell, and block the other end so that the barbell doesn't slide backwards during the exercise. You can block the empty end of the barbell by placing it against a heavy object on the floor, such as a nearby weight stack or exercise machine.
Left (Figure 7): Initial Position
Right (Figure 8): Final Position
Now, straddle the bar and grasp the bar with one hand just behind the plates. With your loaded arm fully extended, bend your knees slightly and position your upper body as close to parallel with the floor as is possible. Place your free hand on your knee for support, and remember to keep your back straight throughout the exercise.
While maintaining the stance shown in Figure 7, pull the bar straight up until the plates gently touch your lower chest, as shown in Figure 8. Keep your loaded elbow close to your side and focus on lifting the weight with your middle back and lats. Once the plates gently touch your lower chest, lower the bar under control until your arm is fully extended, but don't let the plates touch the floor.
At this point, it's worthwhile to mention that you can perform bent-over long-bar rows by using two hands, as shown in Figures 9-10. Performing bent-over long-bar rows with two arms is identical to performing them with one arm, with the exception that you'll need to load the bar with roughly twice the weight.

Left (Figure 9): Initial Position
Right (Figure 10): Final Position
Whether you choose to perform one-arm or two-arm long-bar rows, remember to avoid using swing or momentum to raise the weight, and keep your back straight throughout the exercise. Moreover, note that since the plates move between the floor and your chest during these exercises, you can get a larger range of motion by using several small plates instead of using a big plate.
Variations Of Rows: T-Bar Row
If you don't want to perform long-bar rows, as described above, you might consider performing T-Bar rows on a T-Bar rowing machine, as shown in Figures 11-12.
You can perform T-Bar rows by straddling a rowing machine and placing your feet firmly on the machine's foot supports. While keeping your back straight, bend down and grasp the bar with a shoulder-width grip, and then raise the bar off its support just a bit, as shown in Figure 11.
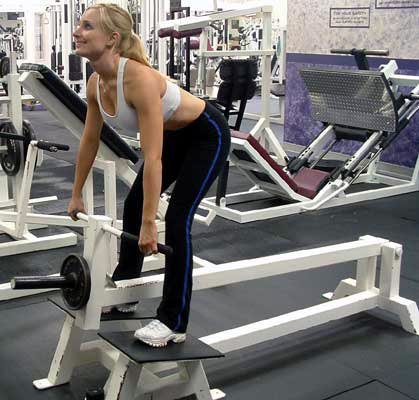
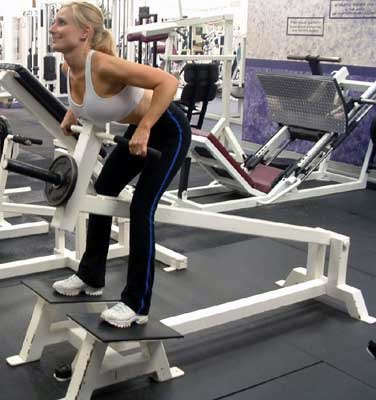
Left (Figure 11): Initial Position
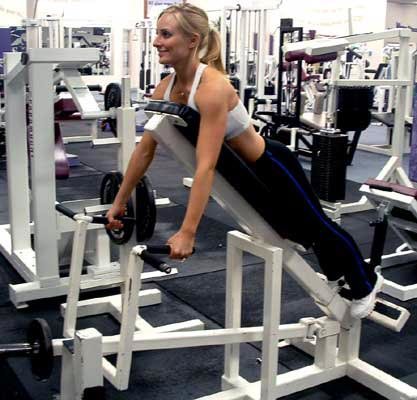
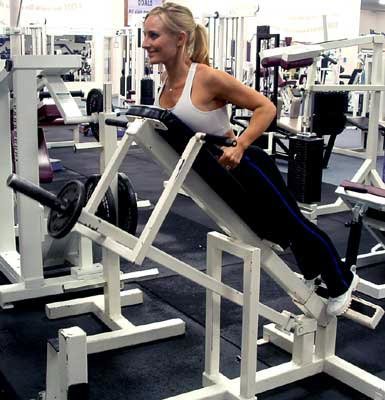
Right (Figure 12): Final Position
While maintaining the stance shown in Figure 11, use your back and lats to lift the bar upward until it touches your lower chest. Squeeze your shoulder-blades together at the top, as shown in Figure 12, and then lower the bar slowly under control until it reaches the position shown in Figure 11.
When you lower the bar, be sure to keep the bar from touching its support at the bottom--this keeps the tension on your muscles throughout the exercise.
Variations Of Rows: Lying T-Bar Row
Figures 13-14 illustrate performing a variation of T-Bar rows where you assume a lying position during the exercise. Performing "lying T-Bar rows" takes your low-back out of the picture, and thus can be a very useful exercise for those lifters having existing lower back pathology.
Left (Figure 13): Initial Position
Right (Figure 14): Final Position
You can perform lying T-Bar rows by selecting the desired weight, lying face down on the padded surface, and grabbing the handles. Depending on the type of machine available, and on the way you want to train your back, you can perform this exercise with an overhand grip, an underhand grip, or a semi-supine grip (i.e., palms facing each other) as shown in Figures 13-14.
In the initial, bottom position, your arms are fully extended as shown in Figure 13. Focus on your back and lats as you pull the weight upward under control. Pull the weight upward until you squeeze your shoulder-blades together, as shown in Figure 14. Then, lower the weight under control until your arms are fully extended as shown in Figure 13.
Make sure you don't lift your body off of the padded surface during the exercise--make your back and lats do all the work!
Variations Of Rows: Seated Cable Rows
A very popular variation of rows is the "seated cable row." Figures 15-16 illustrate performing seated cable rows on a low-pulley machine.
To perform seated cable rows, select the desired weight and sit down on the bench. Place your feet on the foot supports and bend your knees slightly. While keeping your back straight, bend toward the machine at your waist and grasp the pulley handle with a semi-supinated grip, as shown in Figure 15.
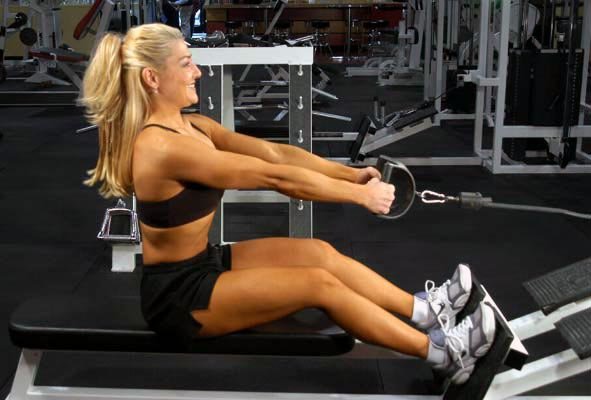
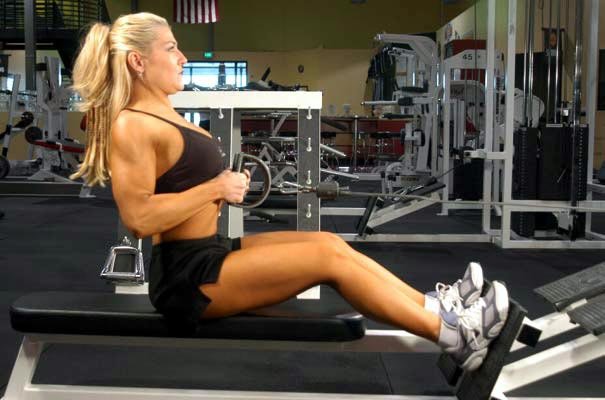
Left (Figure 15): Initial Position
Right (Figure 16): Final Position
While keeping your back straight, pull the pulley handle toward your stomach while simultaneously leaning back at your waist until your torso is perpendicular to the floor, as shown in Figure 16. Strive to make the pulley handle reach your stomach at the same instant that your upper body assumes the upright position.
Squeeze your shoulder-blades together for a maximal contraction at the top of the lift. Then, slowly lean forward at your waist and extend your arms until you reach the initial position shown in Figure 15.
Alternatively, you can omit leaning at your waist all together to emphasize your Latissimus. In this variation, you simply maintain your back in the upright position, shown in Figure 16, and move only your arms throughout the exercise. Remember to squeeze your shoulder-blades together at the top of the lift!
Incorporating Rows Into Your Training
Since rows generally work the muscles in your back, rear shoulders, and arms, it's a good idea to combine rows with pushing exercises that train muscles that work in opposition to the back, rear shoulders, and biceps.
For example, one choice is to combine rows with dips because they generally train the chest, triceps, and front shoulders. Another option is to combine rows with different types of bench presses, which also work the chest, triceps, and front shoulders.
Following is one example of a full-body routine which pairs bent-over barbell rows with dips.
- Barbell Squat
- Leg Curl
- Inclined Bench Press
- Wide-Grip Pull-ups
- Dips
- Bent-Over Barbell Rows
- Inclined Hammer Curls
- Lying Triceps Extensions
- Shrugs
- Abdominal Crunches
Note that the back, rear shoulders, and biceps are trained by the wide-grip pull-ups, too. Because of this, dips are performed after the wide-grip pull-ups. Arranging the exercises in this way ensures that your back, biceps, and rear shoulders get a break before being worked again with bent-over barbell rows.
If you would like to use more than one type of exercise for a particular body part, but still want to perform full-body workouts, you might consider alternating exercises. With this approach, you switch between two different exercises that you perform every other workout day. For example, you might choose the following alternatives for a full-body workout.
|
|
In this routine, exercises A are performed on one workout day, exercises B are performed on the next workout day, and so on. As you can see, chins are alternated with seated cable rows, and inclined bench presses are alternated with dips.
Still, another popular idea is to split up your training so that different body parts are trained on different workout days. Splitting up your training enables you to more thoroughly concentrate on specific muscle groups with more exercises and/or more training volume, as well as giving those muscle groups more recovery time than would be otherwise possible. Following is one example of a 3-way split, wherein different body parts are trained on three different workout days each week.
| Monday (Chest/Shoulders/Triceps) | Wednesday (Back/Biceps/Abs) | Friday (Legs/Traps/Calves) |
| Inclined Bench Press Dips Pec Deck Military Press Lateral Raise Rear Delt Raise Pushdowns w/Rope Attachment Lying Dumbbell Extensions |
Wide-Grip Pull-ups Close-Grip Chins Bent-Over Barbell Rows Dumbbell Curls Preacher Curls Abdominal Crunches |
Barbell Squats Leg Press Stiff-Leg Deadlifts Leg Curls Shrugs Calf Raise |
As you can see, chest, shoulders, and triceps are trained on Mondays; back, biceps, and abdominals are trained on Wednesdays; and legs, traps, and calves are trained on Fridays. Notice that on Wednesdays, wide-grip pull-ups and bent-over barbell rows are used to train the back and dumbbell curls are used for the biceps.
Now let's take a look at a 4-way split routine. The following split utilizes essentially the same exercises as the above 3-way split, but the exercises are arranged on four different training days.
| Monday (Legs) | Tuesday (Chest/Triceps) | Thursday (Back/Biceps) | Friday (Shoulders/Traps) |
| Barbell Squats Leg Press Stiff-Leg Deadlifts Leg Curls Calf Raise |
Inclined Bench Press Dips Pec Deck Pushdowns w/Rope Lying Extensions |
Pull-ups (wide, narrow) Bent-Over Rows Dumbbell Curls Preacher Curls Abdominal Crunches |
Military Press Lateral Raise Rear Delt Raise Shrugs |
As you can see, with this 4-way split the back and biceps have their own training day. This routine could be used when you want to perform more training volume for each muscle group. Following along these lines, you might want to split things up even more.
For instance, you might want to use a 5-way split routine to train more often, but spend less time during each workout. On the other hand, you might want to add more training volume for each muscle group.
Following is one example of a 5-way split routine which uses the same exercises as the above routines, but arranged into five training days.
| Monday (Quads/Hams) | Tuesday (Chest/Abs) | Wednesday (Back/Traps) |
| Barbell Squats Leg Press Stiff-Leg Deads Leg Curls |
Inc. Bench Press Dips Pec Deck Ab Crunches |
Pulls-ups (wide) Chins (narrow) Bent-Over Rows Shrugs |
| Thursday (Shoulders/Calves) | Friday (Triceps/Biceps) |
| Military Press Lateral Raise Rear Delt Raise Calf Raise |
Pushdowns w/Rope Lying Extensions Dumbbell Curls Preacher Curls |
In this 5-way split, the biceps and triceps are trained on their own workday day. Also, calves are trained after the shoulder exercises, and shrugs are performed after the wide-grip pull-ups and bent-over barbell rows.
Alternatives To Performing Barbell Rows
Some trainees may find barbell or machine rows are uncomfortable. For instance, trainees having existing low-back pathology may find that some variations of rows are painful.
Any exercise which causes pain beyond normal muscle soreness should be discontinued, and a qualified health care professional should be consulted. If you cannot, or just don't want to perform barbell rows, or any of the machine variations of rows, any of the following exercises can be used to train the back, biceps, and rear shoulders.
| Back Exercises | Biceps Exercises | Rear Shoulder Exercises |
| Pull-ups (wide, close) Underhand Pull-ups Pulldowns (various grips) Dumbbell One-Arm Rows |
Barbell Curls Preacher Curls Dumbbell Curls Inc. Dumbbell Curls Concentration Curls |
Pull-ups (wide, close) Underhand Pull-ups Pulldowns (various grips) Dumbbell One-Arm Rows Rear Deltoid Raises |
Exercise Of The Week: Barbell Curls!