
Why do most strength programs fall short on results, and even shorter on keeping you healthy? Because they get lost in the details and don't respect the foundations of strength and power. Those foundations aren't muscle groups or even certain lifts like, say, a barbell back squat. Instead, they're "movement patterns."
More smart coaches and athletes than ever are using movement patterns, rather than just muscle groups or certain lifts, to structure their training. You'll find different breakdowns of the movement patterns out there, but here's the list I use and advocate:
- Squat
- Hinge
- Lunge
- Push
- Pull
- Carry
Why focus on these? Because they're the cornerstones of human movement capability. They are not only something that needs to be trained in the gym, but maintained for living and overall functionality. If you're missing or dramatically neglecting one or more of these patterns, don't be surprise when your results and health suffer.
But these patterns have a potential downside: they can be expressed many, many ways, and it can be hard to know where to start. Should you aim to back squat a certain amount, or pull a heavy barbell or trap bar from the floor? What press should you prioritize? What carry?
When in doubt, try some of my favorite exercises for each of the six foundational movement patterns. Get strong on them, and you can't go wrong!
Squat: Concentric-Only Squat from Pins
You can only be as strong as your weakest link. And when training the squat pattern, that weak link is almost always the bottom of the movement itself.
While many lifters attempt to mask their squat's weak link through compensation at the bottom position by bouncing, or even knowingly avoid it by limiting depth, intelligent lifters know they must strengthen this position strategically.
One of the most powerful tools to do just that is called the "reverse method." It involves starting at the bottom aspects of the squat's range of motion with the bar sitting on safety pins. From this position, the athlete positions their body under the bar and drives up concentrically first, before eccentrically lowering the bar back to the pins. This forces a lifter to find their strongest position to maximize their brace while moving a load from a dead stop position in one of the toughest aspects of the range of motion.

The squat from pins is sometimes recommended as a way for powerlifters and other strength-seekers to improve their squat or deadlift, but it has plenty of value on its own, too. It also works with all bilateral squat variations: back, front, Zercher, or in the case of my video, the safety squat bar. That's my favorite, but it also may be the most difficult of the bunch.
To make this exercise variation even more awesome, you can add accommodating resistance like bands and chains to the bar to challenge different parts of the strength curve in the squat. Any way you train it, the reverse method will strengthen that weak link quickly—and simply make you stronger, period.
Hinge: Landmine Romanian Deadlift
As I explain in my Bodybuilding.com BodyFit Elite guide Unstoppable: The Ultimate Guide to Training Through Injury, there are no hard and fast rules stating that you must deadlift a barbell off the floor. You can still reap the benefits of the deadlift or "hip hinge" movement pattern without touching a barbell—or by just grabbing one end of it.
Meet the landmine barbell RDL, the most predictably pain-free hip hinge pattern that you can train. Since one side of the barbell is anchored to the ground, the landmine provides balance and stability. The angled position of the barbell also forces the hips back into an authentic hinge as the barbell comes closer to the body at the bottom aspects of the range.
And most importantly, the landmine RDL can be loaded aggressively and scaled for range of motion. Need it to start higher? Just put the weight on a plate or short step. Don't like hanging onto the bar? Use a double-D handle. It works equally well in both the strength and hypertrophy rep schemes and is perfect for making your hamstrings and glutes blow up without taxing your lower back.
Lunge: Slight Rear-Foot-Elevated Dumbbell Split Squat
When it comes to the lunge pattern, the major mistake I see lifters making—other than not training asymmetrical single-leg variations at all—is thinking that the forward walking lunge across the gym is the only variation they need.
This old-school approach has value, but it's not where I have beginning athletes start, or where I recommend experienced lifters devote most of their lunge-pattern training volume. Instead, I've seen more payoff and functional carryover using split-squat variations with both feet on the ground.
The traditional split squat with both feet placed on level ground is a ball-busting variation for beginners, advanced athletes, and everyone in between. To take this staple one step further, I add a slight elevation of the rear foot in order to gain access to more range of motion.
What—no full-on Bulgarians? Sure, they're great. But instead of using a bench or box with a full rear-foot-elevated split squat position, my favorite variation starts lower. Place your rear foot on 2-3 plates on the ground. From there, split squat down in a vertical straight up and down line, grazing the knee off the ground or the pad and driving up.
The goal here is to keep constant tension in the legs and core throughout and be as smooth as possible. Complete reps in the 8-20 range and remember to do both sides. This will provide a more joint-friendly alternative to the notorious knee-pounding of the walking lunge variation.
Push: Reverse Band Barbell Bench Press
Though band training has been around for more than three decades at this point, the average lifter is still utterly confused as to how and why to implement bands in strength training. Even fewer lifters actually know how to use bands for anything other than making a lift more difficult off the ground.
My favorite pain-free bench press variation literally turns the traditional way of attaching bands upside down. It's the reverse band bench press.
Take two circular bands and attach them to the top—not the bottom—of a power rack. From there, pull them over the collars of each side of the barbell, and slide the weight plates on from there.
The addition of the reverse bands gives the most support to the bottom position of the bench press. That's the range of motion that tends to piss off the shoulders the most. Then, as the lifter drives up through the range of motion, the bands are less stretched, supporting less of the weight of the barbell. Simply put, the reverse bands make the bar lightest at the bottom, and heaviest at the top.
This works extremely well for protecting our most vulnerable position with lower loads, while challenging our strongest position with the highest loads.
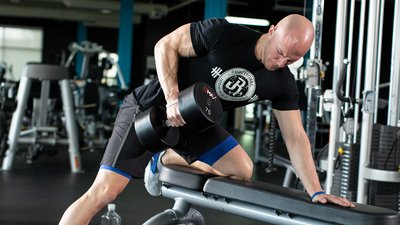
Pull: Dead Stop Single-Arm Row
The single-arm dumbbell row may be my favorite exercise for bulletproofing against chronic shoulder pain, while reinforcing the upper back and encouraging great posture. But many times—we've all seen it—lifters get carried away with this movement, using too much momentum for rep after rep, and compensating through the hips and core. This pretty much negates any benefit you could be getting from this otherwise pain-free movement staple.
One way to avoid cheating your reps on dumbbell rows is to implement a dead stop from a kneeling 3-point stance on the bench. The setup of the knee and opposite hand on the bench, opposite foot extended laterally, and the core maximally braced allows you to lock in the hips and core together as a functional unit. This gives a base of support to train the row more powerfully.
From there, starting and ending with the weight on the ground each rep keeps lifters from the unstable jerking motion that leads to forced internal rotation at the shoulders, unwanted rotation at the lower back, and poor levels of back muscular targeting. When the dead stop happens, the rest of the body remains braced.
This one will fire up the back while also hammering the grip and core. Give it a try.
Carry: Double Overhead Kettlebell Carry
While the traditional farmer's carry with weights positioned to the sides is great, the biggest bang for your carry buck—if you have the overhead mobility to support it—is the overhead dumbbell or kettlebell carry.
If you can do loaded carries in a large open area or parking lot at your gym, great! Do them. However, most gyms simply don't have the free space to walk for extended time periods in a straight line while carrying a load. So when that happens, I recommend hopping on the treadmill. (Yes, you may get a few looks.)
Here's how to do it without truly embarrassing yourself: Before you jump on the treadmill, step on the side rails and press the weights overhead. From there, slowly step onto the treadmill and walk at a pedestrian pace—not too fast!—while controlling the shoulders, hips, and core together to integrate as a functional unit.
Since you are on the treadmill and not having to turn around and hit reverse like Austin Powers in the go-cart, use lighter loads and up the total time. For example, you could aim for 1-3-minute carries. This works extremely well for building work capacity and as recovery on off days from strength training.
Bonus: Landmine Rotational Pull-Press Combo
While rotation is not a foundational movement pattern, I consider it the glue that holds each of the six foundational movement patterns together. And if the goal is getting strong and powerful, it's essential.
The landmine rotational pull-press combines the hinge with the pull and the press. Watch the video a few times, because while it's not as complicated as it initially looks, it does have a few subtleties. But the real key here is speed. You're maximizing force and transferability of force through the legs, into the core, and through the arms.
Don't load this one too heavy. It's best as part of a warm-up for upper-body push training, priming the nervous system to perform optimally, like I describe in the article "This is the Exact Warm-Up Your Upper Body Needs." Keep reps between 2-6, and keep the speed sky-high. Be explosive, and you'll see instant explosive carryover.