How To Squat: Layne Norton's Squat Tutorial

Dr. Layne Norton has spent years refining his squat technique. Follow his coaching tips and cues, learn how to squat, and you someday could be the proud owner of monster legs!
I used to be that guy with chicken legs. Why? Because I didn't squat. I made up every excuse I could think of to get out of squatting: they're bad for the knees, they're bad for the back, they're hard. I escaped squats by doing every other leg exercise I could think of, but my legs were still tiny.
Layne Norton Squat Tutorial
Watch The Video - 16:53
One day I had an epiphany. I was sick of having little legs, so I made a goal to squat over 500 pounds for reps. I assumed that amount of weight would give me the big legs I wanted. After years and years of work and learning proper technique and programming, I did squat over 500 pounds for reps. Today, my one-rep max (1RM) is 655 pounds. I'm happy to report that, after all that work and all that weight, my legs are no longer twigs.
If you want big legs, there's one rule: you gotta squat! Don't go running to the nearest rack without watching this video first. I'm going to teach you tips and techniques I've learned over the years from working with some of the top coaches in the world, guys like powerlifter Ben Esgro, USAPL World Team Head Coach Matt Gary, and Dr. Mike Zourdos. They will help you squat big weights more safely and effectively
How to Squat Everything You Need To Consider
1
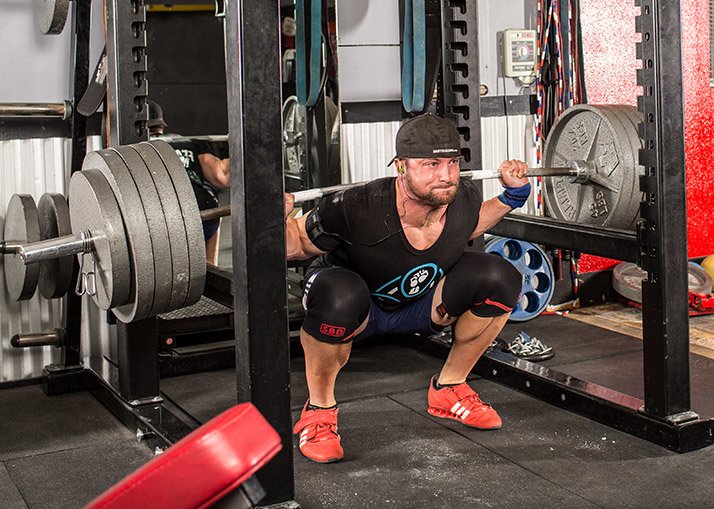
Equipment
Equipment can make a big difference in your squat performance, especially when you're under a lot of weight. Here are a few things you can put on that can make you a better squatter.
Footwear
The purpose of a tennis shoe is to distribute your weight evenly and to cushion your foot. But, in a squat, you're pushing down against the earth. Physics dictate that the earth presses back up. If you use a cushioned shoe, you'll lose some of that energy transfer. It's also going to make you unstable. Those of you who do squat in sneakers may find that your knees cave in and that you feel wobbly.
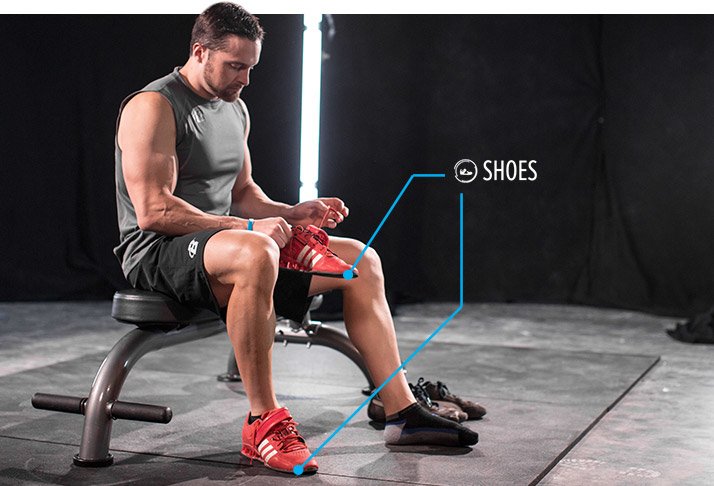
At minimum, you need to use a hard-soled shoe. Converse All-Stars are a great choice. I also like weightlifting shoes. The great thing about weightlifting shoes is that they have a hard sole and an elevated heel.
The elevated heel puts you in a more ergonomic position for squatting, allowing you to push of your heel and mid-foot better.
Belt
A sturdy weight belt can make a huge difference in your squat. A good belt will give your core something to brace against, will protect your lower back, and will keep you more upright.
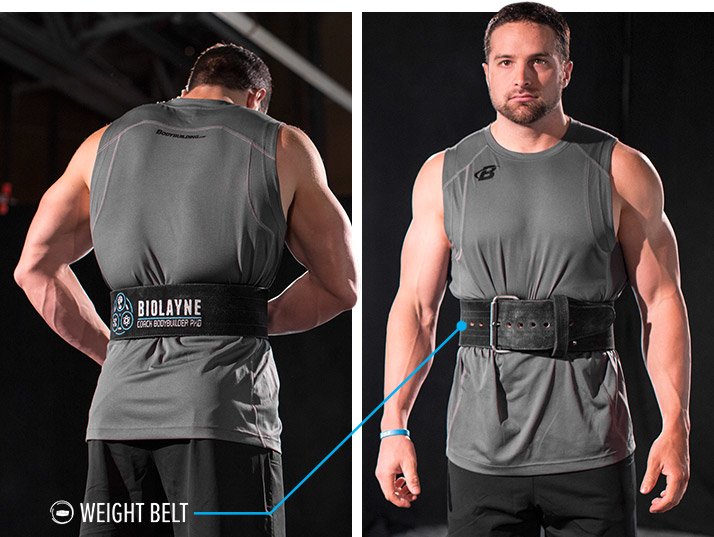
The rumor that wearing a belt will weaken your core is just plain wrong. Research shows that wearing a belt will actually give you more core activation because it provides your core with something to push against.1,2
Most people wear their belts too low. A lifting belt doesn't go around your waist, but around where your abdominal wall will push out. So, find where your abdominal wall pushes out, and then put your belt around that area.
I recommend buying a sturdy, buckle belt that's at least 10-13 millimeters thick and 4 inches wide.
Knee wraps or sleeves
Knee wraps and sleeves help keep your knees warm and provide some extra support. I prefer knee sleeves to wraps because they're quicker and easier to get on and off, and there's some evidence that wraps can put too much pressure on the patella.
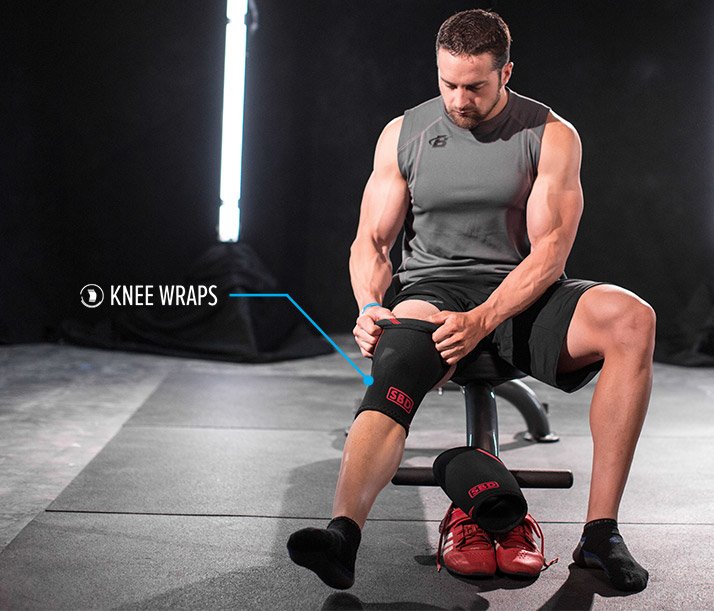
I also like to know that it's me moving the weight, and that I'm not getting a PR because of knee wraps.
Chalk
Most of you are used to using chalk on your hands. Chalk wicks away moisture so you can get a better grip on the bar. Because the bar is sitting on your shoulders during a squat, however, you don't really need it for your hands.
However, in a low-bar squat, chalk can help keep the bar on your back and keep it from rolling. So, I recommend getting a block and chalking your back before you squat, especially if you're going heavy.
Wrist wraps
For those of you who do high-bar squats, wrist wraps may not be necessary. But for those who prefer the bar in a lower position, wrist wraps can be helpful. Wrist wraps help keep your wrist straighter and can help prevent wrist and elbow pain.3

One mistake people make with wrist wraps is that they wrap too low. You want to wrap above and below the wrist joint to provide more support. The wrap should actually go around the lowest part of your palm.
* Ratings as of article's date of publication
2
Execution
When it comes time to squat, a lot of people get under the bar and just go for it. This is a mistake. You should have a repeatable plan for getting under the bar and stepping out.
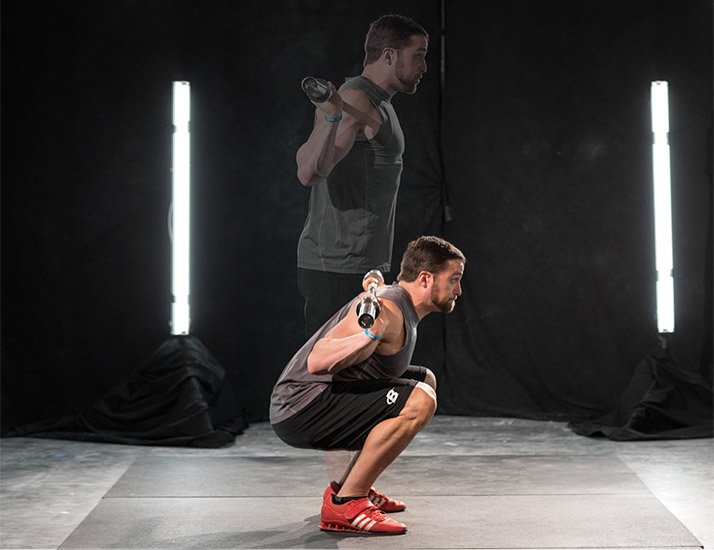
The Setup
Before squatting for broke, get yourself under the bar and get the bar in the proper position on your back. Remember, your mid-foot is your center of gravity, so you want the weight to be over your mid-foot. Take a deep breath in. Squeeze your glutes forward to get the bar off the rack.
Now that you've unracked the weight, it's time for the walk-out. I like the three-step approach because it's efficient, simple, and repeatable. Once you unrack the weight, let it settle. Don't immediately start walking back. When you're ready, take a small step back with one foot. When that foot settles, take a step back with the other foot. Then, move that first foot to line it up with the second foot.
Once your feet are in position, you can adjust your feet a little to make sure they're even. I don't recommend a super narrow or a super wide stance. Position your feet as if you were going to do a standing jump.
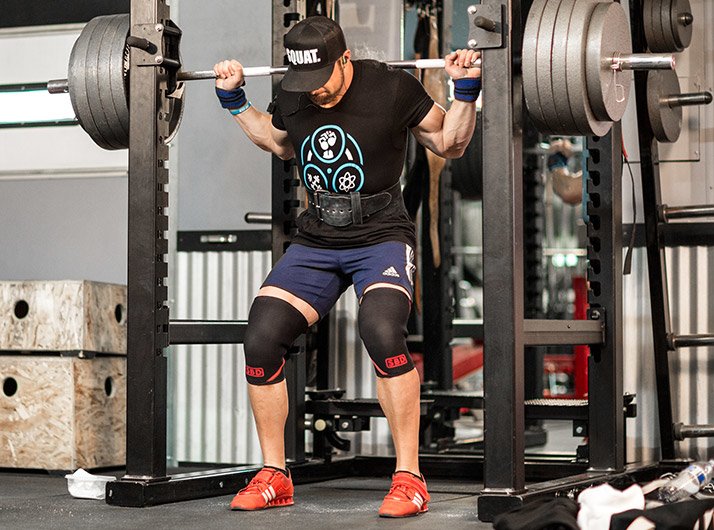
Remember, your mid-foot is your center of gravity, so you want the weight to be over your mid-foot.
It's also important that you don't point your toes too far out. If they're anywhere near 45 degrees, they're too far. An easy way to find out where your feet should be is this: Once you've unracked the bar and are in your stance, squeeze your glutes. That should move your toes where they should be.
Breathing
Most people don't take in nearly enough air when they lift heavy. Before you squat, pretend like you're taking your last breath before the whole room fills with water. Breathing in deeply will help brace your abdominal wall and activate those deep ab muscles. Holding your breath will also help you maintain spine neutrality.
Once you've taken a deep breath, push your abs out without breathing out. Don't think about flexing your abs, but rather think about pushing with your abdominal wall. How would you prepare for a punch? You would brace. Do the same when you squat. Your abdominal wall is what stabilizes your lower back. So make sure you're bracing.
Hip Drive
The squat isn't only an up and down movement; it's also a back and forth movement. Once you have your air in, your core braced, and your glutes engaged, start by driving your hips back. Sit down between your legs.
By using your hips, glutes, hamstrings, and lower back, you're recruiting the biggest, strongest muscle groups on your body. Once you hit depth, if you're braced correctly, you should start to come back up naturally.
As you start coming up, don't just think driving up. Think about squeezing your glutes and bringing your hips forward. Even if you're halfway up in a squat, you can lock it out by just thinking about driving your hips forward instead of standing up.
When you finish the squat, squeeze your glutes so your spine and your hips are aligned perfectly under the bar.
Knees
As you sit down between your legs, drive your knees out over where your toes are pointed. Don't allow your knees to collapse in or shoot forward. If you lead with your knees in a squat, your calves will tighten and it will cause you to lean forward. If you're leaned forward too far, you could be in danger of spinal flexion, which is super dangerous in a squat.
Leading with your knees can also cause you to stop well short of proper depth. In order to maximize gains in strength and hypertrophy, you want to take the exercise through the entire range of motion.
As you sit down between your legs, drive your knees out over where your toes are pointed. Don't allow your knees to collapse in or shoot forward.
Back Angles
I hear a lot of coaches tell their athletes to stay upright during a squat. That's true, but only to an extent. You want to stay upright, but the angle will changedepending on your structure. If you have long femurs and a short torso, you'll need significantly more forward lean to achieve depth and to keep the bar over you mid-foot. Someone with shorter femurs and a longer torso will be able to stay more upright.
Regardless of how far you lean forward, it's essential to maintain spine neutrality. Spine neutrality means that your back is straight, even if you're leaned forward. The danger occurs when your spine caves forward and rounds.
Depth
Proper depth happens when your hip joint goes slightly below your knees. I think you should squat as deeply as you safely can. People with longer limbs won't be able to go as far down without losing neutrality. But, almost everyone can learn to do a good, below-parallel squat.
Bar Path
As you travel down and up, the bar should stay in one line directly above your mid-foot or close to it. That way, the bar is directly over your center of gravity and you get them maximum force transmission from your feet to the bar.
As you travel down and up, the bar should stay in one line directly above your mid-foot or close to it.
Even if you have a really good squat, the bar path may not be completely straight. That's OK. Keep in mind, though, that the fewer deviations you have from straight, the more efficient and easier the movement will be.
3
Bar Position
Most of you are probably comfortable with the bar sitting on top of your trapezius muscles. For some people, a high-bar squat can be easier to do while staying upright. It's also a little more comfortable. Others, however, prefer a low-bar squat.
In a low-bar squat, the bar sits about two inches below your traps on top of your rear delts. This position is a little more uncomfortable because your shoulders are bunched up. But one huge advantage to the low bar position is that the majority of people will be more powerful. With the bar in a low-bar position, you'll have to start out with a little more forward lean, but you should be able to maintain a more neutral spine as you descend.
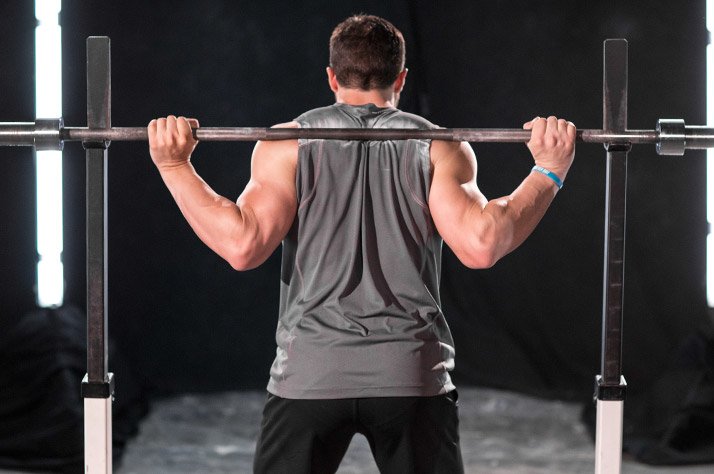
With the bar in a low-bar position, you'll have to start out with a little more forward lean, but you should be able to maintain a more neutral spine as you descend.
To put the bar in a low position, grab the bar as narrowly as you comfortably can. Then, put the bar on top of your traps like you would to do a high-bar squat, but let it slide it to the next shelf down. You'll feel the bar catch. That's your position.
How do you know which is better for you? I recommend trying both. But, in general, people with shorter legs and longer torsos may be better able to do a high-bar squat, whereas people with longer legs and shorter torsos may be better in the low-bar position.
Build Serious Strength with Ph3
Follow Layne Norton's personal strength program, along with over 40 other full fitness plans, for only $8.99/month!
References
- Zink, A. J., WHITING, W. C., VINCENT, W. J., & MCLAINE, A. J. (2001). The effects of a weight belt on trunk and leg muscle activity and joint kinematics during the squat exercise. The Journal of Strength & Conditioning Research,15(2), 235-240.
- Lander, J. E., Hundley, J. R., & Simonton, R. L. (1992). The effectiveness of weight-belts during multiple repetitions of the squat exercise. Medicine and science in sports and exercise, 24(5), 603-609.
- Coutinho, M. The Wrist wrap as a protective and performance enhancing device in powerlifting.