
There's a time and place for loading and, when it's the desired goal, why not get it right? I cringe when I see the mistakes that many gym users make when it's apparent that their goal is to lift as much as possible. Whether or not they're going for max for the right reasons is difficult to say. From the physiques that most possess, however, I suggest that they're maxing out for the wrong reasons!
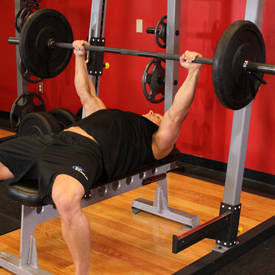
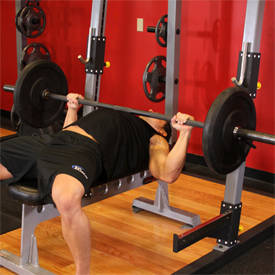
Barbell Bench Press - Medium Grip
However, for the sake of this article, and so I can sleep at night, I'll assume that you want to lift as much as possible in the bench press exercise for the right reasons. Here are a few tips. They're natural in that they don't involve any drugs. They're legal in that they can be used in powerlifting or bench press competitions. And, best of all, they'll work immediately!
Most strength trainers will never know these "secrets" and, unless they gain access to information such as that contained in this article, they'll continue to miss out on the significant gains that come from such seemingly subtle modifications. So, if loading is your goal in the bench press at a given point in time, don't miss the boat.
The 15 Secrets
1
The Floppy Bar Syndrome
If you use a "whippy bar" such as a competition Olympic bar, you'll lose a lot of energy controlling the whip (the multidirectional movement) of the bar. Of course, the heavier you go, the more this poses a problem. But don't get wobbled out of a heavy lift.
Use the bar that has the least whip. Save the whippy bar for Olympic lifting. You'll be stunned at how much difference this aspect makes, either adding or subtracting as much as 5-10% to or from your 1RM.
2
The "Thick As A Brick" Equation
There may be as much as a one-centimeter (1/2-inch) difference between the circumferences of different bars at the point where you grip it. While there's an optimum bar circumference relative to your hand size, I'd recommend using a bar with the circumference of nine to nine-plus centimeters, as opposed to the one that's over ten centimeters.
I know, it doesn't sound like much, but that one centimeter equates to about a 10% difference in the actual measurement and will cause about a 5% difference in your lift! True, the fatter bar may lead to further hypertrophy when used over a relatively long period, but we're talking about lifting big weights here!
3
The Bent Bar Factor
Normally, using a bent bar wouldn't make much difference. But once you go anywhere above 70% of your 1RM, you'll really notice the impact of a bent bar. Not only will it reduce the load lifted, it may also cause you to strain or tear soft tissue. Avoid it like the plague!
Put the bar on the ground and roll it. You'll be able to tell if the bar rolls smoothly, or whether it lopes along like an old man with a wooden leg. (Pretend that you're about to play Fats in a game of billiards and you're checking out your pool cue.)
I've seen bars that look like they could make 90-degree turns, and multimillion-dollar athletes use them without a clue! The "trueness" of a bar can make 2-10% of a difference on your lift, depending on the extent of the bend.
4
The Circle Of Life
Most Olympic-type bars have a circle grooved into them to give you feedback about your hand positioning. For you, your medium or average grip may be with the outside of your palm touching this line.
Don't assume that all Olympic bars in your gym are equal, though. Doing so could result in you using a considerably weaker grip and leave you scratching your head!
My "made in Taiwan" Olympic bar has lines 102 cm apart, as opposed to my Eleiko bar lines, which are 90 cm apart.
This is a massive factor, and it could make as much as a 5-15% difference in the amount of weight lifted!
5
A Slippery Deal

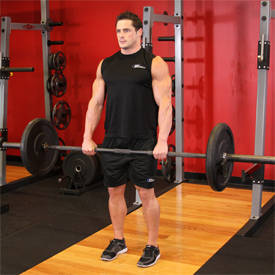
Barbell Deadlift
A bar's knurling is the roughened grip characteristic of most bars. If you do heavy deadlifts, you're well aware of knurling, as most of the skin of your shin can be found in the indentations of the bar. The amount of knurling that a bar contains often becomes a tradeoff between getting some hand grip and not losing all of the skin on your shins! No such issues in the bench, though.
If you use a bar that's shiny or slippery, you lose too much energy fighting the lateral hand slip, even when using chalk. If you want to keep your hands soft for your girlfriend, like the slimy character in "Of Mice and Men," you don't have to use the roughest bar. But you want one that provides an adequate grip. I find that a slippery bar can cause you to lose up to 5% of your 1RM.
6
Pick The Right Height, Dwight
Optimum dimensions for bench height will be influenced by your stature. Ideally, you need to be able to have an acute knee angle (less than 90 degrees) with your feet flat on the ground. If the bench is too high, you won't be able to achieve this acute knee angle and still be able to have your feet flat on the ground, which is necessary so that you can exert force through the feet.
If the bench is too low, your knee angle will be too acute, and you'll be mechanically disadvantaged when it comes to driving through the ground with your feet. Most competition bench presses are about 45 cm off of the ground. This is for a person of average height. If the bench is way off, compared to your height, it could make at least a 10% difference to your 1RM.
7
Pick The Right Width, Sid
Optimum dimensions for bench width again will be influenced by your bodyweight, shape, and back width. Ideally, the bench will allow you to place most of your force through your scapula, which should be in a retracted and motionless position. If the bench is too narrow, you won't be able to find a flat, firm place to create that action-reaction through your shoulder blades.
If the bench is too wide, the only harm is that it will restrict your range during the lowering. (While doing cambered benches, I usually find symmetrical bruising behind my shoulders every time, and it took me a while to figure out why!)
Therefore, using a bench that's too narrow is the main concern. Most competition benches will measure about 30 cm wide, which is ideal for the average lifter. An extremely narrow bench (relative to you) could cost you at least 10%-15% off of your 1RM.
8
Pick The Right Foam, Jerome
If you use a bench that reminds you of your grandmother's 50-year-old sofa, it's too soft. You'll lose energy while stabilizing the movement of the shoulders.
I prefer a harder bench to a softer bench. Think of the mechanics of action-reaction: the harder the surface, the greater the "rebound;" the softer the surface, the greater the dissipation. A really soft bench (as used in most commercial applications) may cost you 5-10% off of your 1RM.
9
I'd Like To Use A Lifeline, Regis
Using a spotter can sometimes be invaluable, but this goes both ways. For some trainees, the realization that they have a spotter handy to bail them out will negate the urgency to complete the lift. If that's the case, I'd discourage the use of the spotter, but I'm going to assume that you're smarter and more committed than that.
So, rather than taking the spotter away, I recommend that you use one for the positive psychological perspective, and here's why. I don't want you to use any of your mental energy wondering what the implications will be (embarrassment, injury, etc.) if you can't complete the set or rep.
Rather, I want total mental focus on getting the lift, and positive mental rehearsal. Removing the fear of failure can make the difference of at least one or two reps! And in a 1RM, that's everything!
10
I'd Like To Use Another Lifeline, Regis
If you take the bar out of the racks, you're removing it in a "weak" or mechanically disadvantaged position (from above your head). It'll feel heavy, and the risk of injury is higher. You don't want to commence the lift with a feeling of, "Shit, this is heavy!" Additionally, you'll be using more metabolic and nervous energy to take the bar from the rack position to the over-the-chest start position.
Use a spotter to do this with you! But train them to ease it onto you instead of letting it drop like a rock off of a highway overpass! As mentioned above, this technique can make the difference between getting the single, double, or triple and not achieving them.
11
The "Home Of The Golden Arches" Principle
If you want to lift at your max, you're only kidding yourself if you don't use some kind of body arch! An arch of the trunk reduces the distance that the bar travels, increases the potential contribution of the lats and lower pecs, and creates an arc in the lift, as opposed to being straight up.
All of this translates into more weight being lifted. I classify three arches.
- First, a subtle movement is performed after you lie down on the bench in which you slide your bum/hips up closer to your shoulders.
- The second type is a more aggressive position in which you place your shoulders down first upon lying on the bench, then put your bum/hips down as close as you can to your shoulders.
- The third, final, and most aggressive (and, therefore, most effective) arch technique is the one used by powerlifters in competition. Start right on the bench by positioning your feet far back, driving your hips in the air and back down the bench, then driving your shoulders into the bench in a position that's close to the feet. It's a little more complicated than this description, but you get the general idea!
Some Arch Advice
- A few words of advice, though. Warm and stretch the lower back before using any of these arches. Come out of them slowly. Do a reverse stretch (cradle) on the bench before getting up. Don't overuse this technique, though.
- Save it up for the max strength phase. Arching is probably the most powerful of all of these techniques and tips and can give you up to 20% extra on your 1RM!
12
The "Isaac Newton, For Every Action, There's An Equal And Opposite Reaction" Principle
I identify four main points where vital action-reaction dynamics are occurring, and if you aren't using them, you won't lift to your potential.
- The most important would be the shoulder blades. Most of the loading goes through this point. You must learn to use your shoulder blades as nonmoving, stable points of action-reaction. Drive through them!
- The next important point is feet and legs! When I see lifters moving their feet or, worse, still flailing them about during a max lift, I cringe.
- The action-reaction potential of the feet contacting the ground is significant. To do this properly, make sure that the knees are slightly bent, feet flat, and drive through them into the ground without moving the feet during the lift.
- The head and hips aren't as significant, but they still contribute to the "tightness" of the body during the lift. They shouldn't move during the lift.
An awareness of how to use these action-reaction points could be worth another 10% on your lift!
13
The "Keep Those Blades Sheathed" Principle
I want the shoulder blades not only retracted during the lift, but still, too. They provide the greatest area of action-reaction.
Most trainees allow them to protract (drift outward) with the completion of the concentric phase. Don't! Hold them tight and still.
It's almost impossible to reposition them for the next rep, and as soon as you've "lost" them, they can no longer act as the major action-reaction site. This simple habit could contribute as much as 5% more on your bench.
14
The "When In Trouble, Go To The Head" Principle
Going to the head and emptying your bowels will increase your bench by up to 200%, particularly if you've eaten a really heavy Mexican lunch. I'm kidding!
No doubt, you've heard or read about the "sticking point" during the concentric phase of the lift. This is the point of greatest mechanical weakness, the point at which you're most likely to fail.
When you get into this zone and feel the lift slowing, consciously, progressively, and minimally drive the bar more toward the head (i.e. upward at a 45-degree angle), as opposed to straight up.
This keeps the bar moving and may actually allow you sneak through this weak joint angle. However, timing the use of this technique is critical: too early and you'll lose it, too late and you'll be too fatigued. And worse, if you overdo it, you'll drop it onto your head!
15
The "Oxygen Is Good Stuff" Principle
How you breathe during a max bench can make a massive difference. The importance of holding the breath and its impact on intra-abdominal pressure is widely known. Hold your breath until you're just through the sticking point. This assists in the expression of force and maintains a firmer structure from which to drive (more important in pushing than pulling movements).
But what's less known is the use of breathing during other parts of the lift. When you take possession of the bar (from the rack), you should have full lungs, temporarily holding your breath. This prevents that initial feeling of being crushed by the load, a technique used extensively in powerlifting for both squats and benches.
From here, any inhalations or exhalations (except for those that take place during the actual lifting phase) have to be shallow and quick to avoid losing this firm base. When you begin to lower the bar, be careful not to breathe in too early, as this will make the time frame between the end of the inhalation and the sticking point too long, possibly causing a degree of hypoxia or shortage of oxygen in the muscle cell.
You can train yourself to hold your breath for longer periods of time. This is what most powerlifters inadvertently do. But, for the average lifter, finishing the inhalation too early can cause you to miss the lift.
Conclusion
Granted, many of these tips are aimed at powerlifters and bench freaks who just want to lift a lot of weight. But many of these principles have direct applications to bodybuilders, too.
After all, proper technique, with the added benefit of proper equipment, will lead to additional hypertrophy all the more quickly. Now go slap some poundage on that bar.
Who Was Minnesota Fats?
Rudolph Wanderone was a well known pool player who went by the nick-name Minnesota Fats, though he was said to have never actually been from the North Star State.
Contention about the name centers around the notion that Wanderone may have "borrowed" it from Walter Tevis, author of The Hustler. Wanderone insists that it is in fact the other way around and that Tevis based the book on him.