Beyond Big On The Basics: Your Complete Deadlifting Guide!

Plenty of people know the basics of deadlift form, but their knowledge falls apart in the face of heavy weight. Move more plates with this guide from one of the strongest powerlifters in the world!
In just a few short years, Animal athlete Dan "BOSS" Green has established himself as one of the greatest professional powerlifters of all time. Ranked as one of the 50 fittest athletes in the world by Men's Health magazine (number 20 in 2014, ahead of athletes like Usain Bolt, Colin Kaepernick, and Novak Djokovic), BOSS has had a tremendous impact on the platform and in the gym.
As the founder of Boss Barbell Club in Mountain View, California, BOSS also oversees the training of a growing community of serious lifters and strength athletes. As dominant as he's been on the platform, he's just as effective as a coach. And his role as teacher flows naturally forth from the fact that he is, at his core, a true student of the game.
Standing by our ethos at Animal, that useful knowledge represents true power, we're striving to put some of the best lifters and bodybuilders in a unique position to educate strength athletes all over the world. We call it "Big on the Basics Beyond." Think of it as a kind of master's class in the art of lifting.
In this video feature, Dan Green displays his mastery of one of the most simple and brutal exercises in a nuanced, thorough fashion. He shares the cues that he has personally used—both for sumo and conventional-style pulling—to achieve world records in two weight classes, 220 and 242, as a raw powerlifter.
If you want to build serious strength and size with one of the world's best exercises, BOSS will be your guide.
Big on the Basics Beyond Deadlift with Dan "BOSS" Green
Watch the video - 21:41
Once a lifter has learned the basics of the deadlift, and they've started to experience the addictive strength and mass gains that can be gained with regular heavy deadlifts, the logical question arises: How do you lift more? There is no secret. The truth is, getting better at deadlifting comes down to two very basic things: strength and technique. Both are equally important.
To make these two words more meaningful, and to provide some much-needed context, let's look at what's happening during a typical deadlift. To me, the deadlift consists of three phases. Each one sets up what comes after it, so treat them all as equally important.
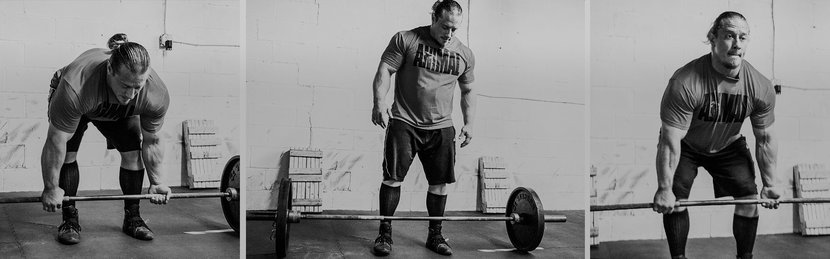
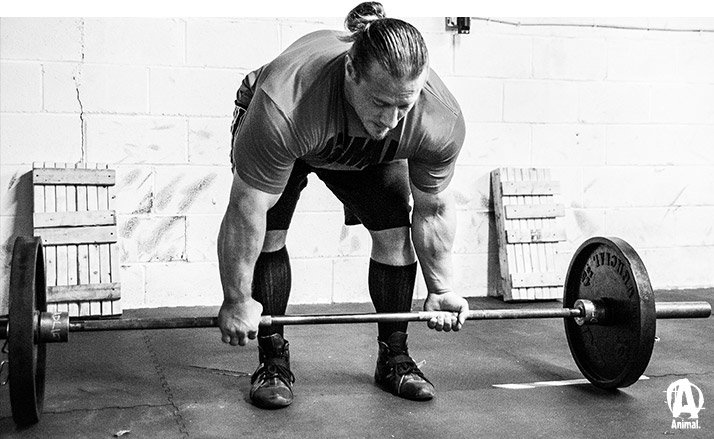
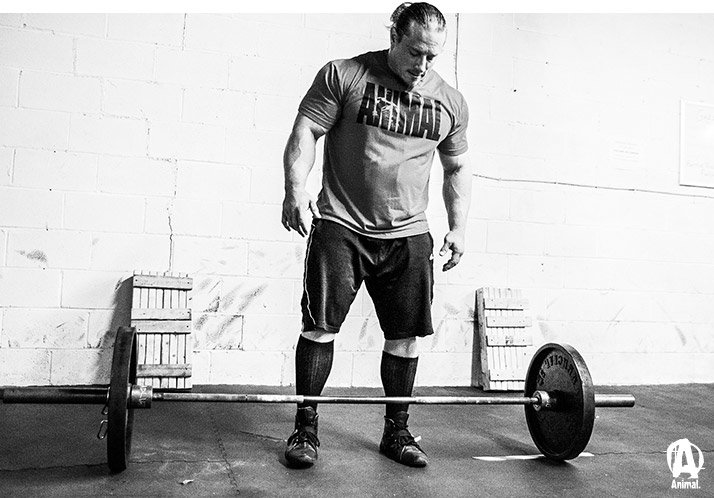
Deadlift Phase 1 Prelift Setup and Tension
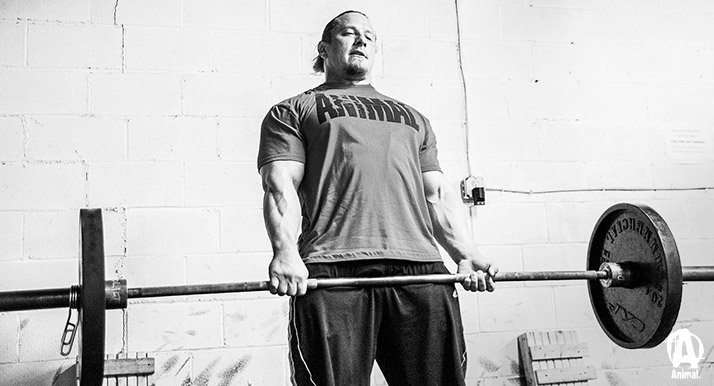
I talk in the video about the basics of setup, including how to keep the bar from getting either too far from or too close to—yes, there is such a thing as too close—your shins.
Before the lift begins, set your feet, grip the bar, and create tension against it. Once your body is in place, take a breath, hold it while bracing your abs, and begin creating tension—first with the muscles of your upper back, and then the lower, as if you were going to row the weight. The more tension you can create throughout your body before the bar breaks off the floor, the more you can expect the bar to accelerate off the floor.
Once your body is in place, take a breath, hold it while bracing your abs, and begin creating tension—first with the muscles of your upper back, and then the lower, as if you were going to row the weight.
I recommend pulling against the bar with your back to create maximum tension throughout your body. This is what lifters really mean when they say, "Pull the slack out of the bar." This allows you to be in the best position when you initiate the first pull.
Pulling with your back may sound like exactly what you don't want to do during a deadlift. But the truth is that the bent-backed deadlift we've all seen is the result of people pushing with their legs first. Their hips pop up, and their back ends up doing way too much of the work.
The most important thing when you're about to lift is to put tension in your back first, so you're pulling the bar before your legs drive. Then load up your legs to do the work.
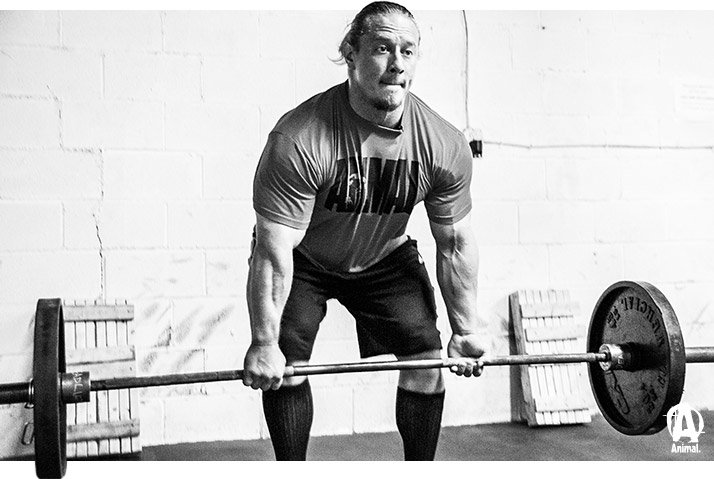
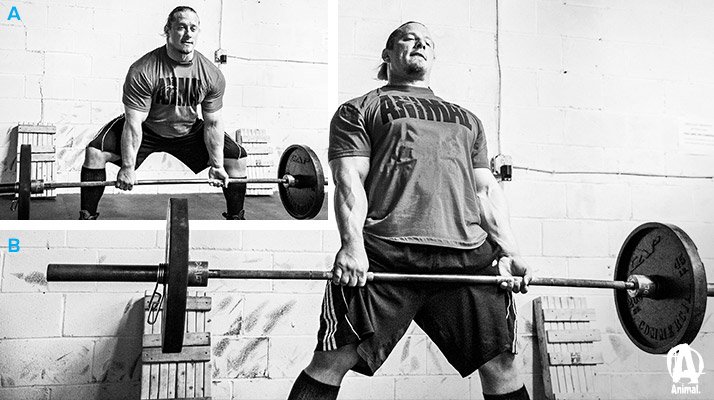
Deadlift Phase 2 The First Pull
The "first pull" begins when you first begin to break the weight away from the floor, and lasts until the bar is at the top of your shins. During this phase, you have to stabilize the spine while generating upward acceleration from the force of the leg drive.
The "first pull" begins when you first begin to break the weight away from the floor, and lasts until the bar is at the top of your shins.
Because the bar still has to pass in front of your knees, you are limited in how much your legs can do by how much stability your spine can create. During this phase, the spine is effectively experiencing isometric and then eccentric loading.
Here's what I mean by that: Even though the legs are creating upward momentum in the lift, your spine is fighting to stay in position and, as the weights increase, providing as much tension as possible while being flexed forward. This concept of isometric and eccentric loading is really important when I work with a student in trying to troubleshoot poor starting strength and technique. Make no mistake—it's different from the type of back strength required during the final phase of the lift.
Deadlift Phase 3 The Second Pull
The "second pull" begins when the bar starts to pass the top of your shins, and it ends when you complete the lockout and stand tall with the weight. Technically speaking, this phase begins when you switch from eccentric loading of the back (flexing the spine) to concentric loading. In other words, once the spine has stabilized, the second pull is the process of extending the spine again.
The "second pull" begins when the bar starts to pass the top of your shins, and it ends when you complete the lockout and stand tall with the weight.
During this phase, the legs are creating drive and the back is pulling. You are using all of their strength and your willpower to extend your entire body against the weight. But again, what's important here is that it's the phase during which the spine is extending. Creating that kind of strength is different from what's needed in the first pull.
So, how do you create it? Assistance exercises can help, of course, and I'll give you my favorites below. But, in my experience, the answer is even simpler than that.
The power of a pause
The best way I've found to coach the technique so that a lifter will be fundamentally sound in all three phases of the lift is to focus on static holds or pauses at all the transitions between phases.
This basically amounts to pausing with the bar either an inch off the floor and then accelerating upward, or pausing at the upper shin and then accelerating upward (don't practice both at the same time). If you are able to hold these positions under load and maintain your spine's stability, and balance on the midfoot, then you'll be in a position to optimally generate force and therefore accelerate the bar out of that position.
The idea of balance bears repeating. At the point of the pause, you should feel balanced. If you feel like you're out of balance, you should be able to use that to figure out the problems you've got.
Why is that so important? During a deadlift, if you get out of proper position, you won't be able to generate maximum force. Instead, you will be relying on the momentum the bar already has to complete the lift. A proficient lifter is always in the optimal position to maximally generate force. A proficient lifter is constantly trying to accelerate the bar.
If you do the work and focus on accelerating the bar past your knees and to lockout, your technique will be ready to stand up to your heaviest sets.
Accelerate to Lockout
The idea of keeping the bar accelerating is absolutely critical. I can't stress it enough.
But, just to be clear, acceleration is different from bar speed, which is how fast the bar is moving. Acceleration is about how fast the bar is gaining speed. If you yank the bar off the floor, it has accelerated quickly to a high speed. But if the bar slows down because you neglected to stay in an adequately strong position, then the bar will decelerate. Yeah, that's bad.
Without getting all fancy and scientific, the takeaway is simple: You want the bar to accelerate off the floor and past the knees. Again, these positions mark the transitions between the three phases of the deadlift that I described above. This is why I encourage lifters to practice pausing in and accelerating out of those positions.
This is the simplest way to fix your deadlift, period. If you do the work and focus on accelerating the bar past your knees and to lockout, your technique will be ready to stand up to your heaviest sets.

Fixing A Weak Start
Working with pauses will go a long way toward patching up the holes that are keeping you from a bigger deadlift. But some other strategic assistance work will help as well. Here are my other favorites.
Block Pulls
These build torso stiffness to allow for greater power transfer from legs. Use 4-inch blocks for sumo and 6-inch blocks for conventional. While block pulls work well for both styles, I really stress them a lot for sumo pullers. Stick primarily to sets of 3-5 reps.
Squat
Legs create acceleration upward. I like front squats for sumo pullers and back squats for conventional lifters. Safety-bar squats are also fantastic for building the deadlift.
Stiff-Bar Deadlift
If you normally train on a deadlifting bar or a bar that has more whip, try deadlifting with a regular power bar. Less "give" off the floor will make you much stronger and give you a ton more acceleration when you return to the regular deadlift bar.
Stiff-Bar Deadlift
Fixing a weak lockout
Deficit Deadlift
This is where you deadlift while standing on a small box or mats. For conventional pullers, this really is the silver-bullet exercise that everyone is after. This lift will make you better at finishing the lift because you are starting further from the lockout and in a more difficult position to pull from—and that is the key. Sumo pullers should also do these conventional to hit the back where sumo misses.
Most people can use a 2- to 4-inch box. This exercise puts the pulling muscles of the back, glutes and hams under tension for a longer of time, across a greater range of motion, and teaches you how to bend the upper back a little bit to get down to the bar. This single exercise will allow you to pretty much make massive gains in strength.
Rows
Rows of all types are necessary to create the upper-back strength a lifter needs to pull big weights. They are also especially helpful in the lockout. Make sure the motion includes a big stretch of the lats and traps to get optimal carryover to your deadlift.
Stiff-Legged Deadlift
Stiff-legged deadlifts are basically the poor man's hyperextension. Stiff-leg deadlifts build the back and hamstrings without the help of leg drive. This means you'll need to use weights that are a little lighter. I prefer to start with sets of 10 when I am far from a competition, and then switch to sets of 8 and eventually 6 to handle heavier weights. I prefer not to hit lower reps than that so the form stays consistent.
Grip The other problem with your lockout
This one goes out to the sumo lifters. Most people, when they start learning to sumo deadlift, and they start getting the hang of using their hips, discover they can pull a lot more weight off the floor. So the tendency is to go a lot wider and use a narrower grip. It makes the start easier and allows them to get a lot of weight moving. However—and this might not be a problem for a while—they eventually start struggling with the lockout once weights get heavy.
Make sure your grip isn't narrower than shoulder width. A narrow grip will make it very hard to lock out, because either the hands will restrict the shoulder blades from pulling back, or the shoulders will pull back and cause the hands to break open and lose the grip.
A shoulder-width grip or slightly wider will allow you to utilize the lats and traps more effectively at the top and have more leverage to lock out. So, while narrow may seem stronger off the floor, it can and will sabotage your lockout.
Bring Your Dead to Life
I hope you found this article useful in building a bigger deadlift. To see the mechanics of what I'm talking about in action, be sure to check out the video, which addresses several things I didn't discuss here. Train hard, but always train smart and with a plan.