
What do you do when you're missing the machine you need to perform a certain exercise in my Shortcut to Size program? Or when some guy or girl at the health club is hogging the squat rack? Or when your sports medicine doc tells you to avoid a certain exercise until you're healthy? Skip it and head to the next move? No, you find a replacement!
You don't have to do every move exactly as listed; the muscle-building results come mostly from the Shortcut to Size program design, particularly the periodized microcycles where you vary the rep ranges each week.
Whether you've done the program so many times that certain exercise swap-outs would improve your results due to muscle confusion, or you're limited by equipment availability or injuries, almost any exercise in any of my workouts can be swapped for comparable variations. Below are five of the most common and effective exercise swaps for Shortcut to Size.
1. Incline Bench Press: Shortcut to Size, Weeks 1-4, Day 1
The Swap: Reverse-Grip Bench Press
The incline press can be problematic for your shoulders if you don't do it correctly. Most people make the mistake of flaring their elbows out to the sides, which increases the risk of injury and decreases the effectiveness of inclines for targeting the upper pecs.

Another problem with the incline press is that, despite its being designed to target the upper pecs, studies have shown that it increases upper-pec activity by less than 10 percent compared to a flat bench press. If you compare a bench press performed with an overhand grip to one done with a reverse grip, the upper-pec activity increases by about 30 percent with the reverse grip, suggesting that the reverse-grip bench press is a better exercise for the upper chest than the incline press. Consider this swap if you want to protect your shoulder complex and maximize your upper-chest growth.
Reverse-Grip Bench Press Action Steps
- Lie on a flat bench with a rack and grab the barbell with a standard overhand grip.
- Unrack the weight, lower the bar to your chest, and then, with the bar resting on your chest, carefully switch your grip from an overhand to a reverse grip. Position your hands just outside of shoulder width.
- For each rep, start with the bar over your face, and lower it slowly to just below your lower pecs.
- After touching down, press the bar up and in a slight arc so it ends up over your face instead of straight above your chest.
2. Single-Arm Dumbbell Row: Shortcut to Size, Weeks 1-4 and 9-12, Day 2
The Swap: Barbell Power Row
While dumbbell rows are great for focusing on each side individually, when time is short, you can halve your rowing time by using a barbell and hitting both sides simultaneously. Plus, it's hard to argue that there's a better mass-builder for the back than the classic bent-over barbell row; you can go heavy and maximize the overload placed on the lats.
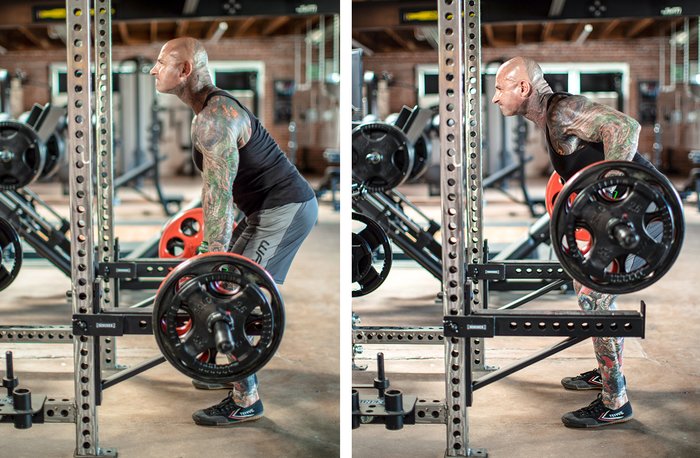
Many people avoid barbell rows due to the stress placed on the lower back. With the single-arm dumbbell row, you support your body on the bench and reduce stress on the spine. If you have a power rack at your disposal, I suggest a rowing variation you can do with a barbell that's great for building size without opening yourself up to injury—the barbell power row. The pins are positioned in the rack to reduce stress on the lower back. At the end of every rep, the barbell goes back to those pins, unlike a typical barbell row, in which you're forced to stabilize your spine by holding the bent-over position throughout the set.
Barbell Power Row Action Steps
- Set the safety pins in a power rack to just below knee height. To find the ideal pin position, stand in the rack holding an unloaded bar with a shoulder-width overhand grip. Bend at the knees as if you're doing a quarter squat, and then bend at the hips until your torso is approximately 45 degrees to the floor. Allow the bar to hang straight down from your shoulders with your arms fully extended. The pins should fully support the bar in this position.
- To perform the exercise, start with the loaded bar resting on the pins.
- Grab the bar with a shoulder-width overhand grip, assume the 45-degree torso angle, and make sure your lower back is flat, not rounded.
- In a fast, explosive motion, pull the bar up to your waist, maintaining roughly the same 45-degree torso angle.
- Lower the bar back to the pins under control.
- Let the bar sit on the pins for a couple of seconds while you settle yourself, then go into your next rep.
3. Cable Rear-Delt Fly: Shortcut to Size, Weeks 1-4, Day 3
The Swap: Bent-Over Dumbbell Lateral Raise
Using cables is a great way to target the rear delts with constant tension, but you may not have access to a cable setup, or even if you do, you may find that it's always busy at your gym. Machine rear-delt flyes are another option, but that's another piece of equipment you may not have available.
No worries, as you can do the dumbbell version of this movement anywhere. It's a great at-home exercise, too, since it requires a relatively light weight.
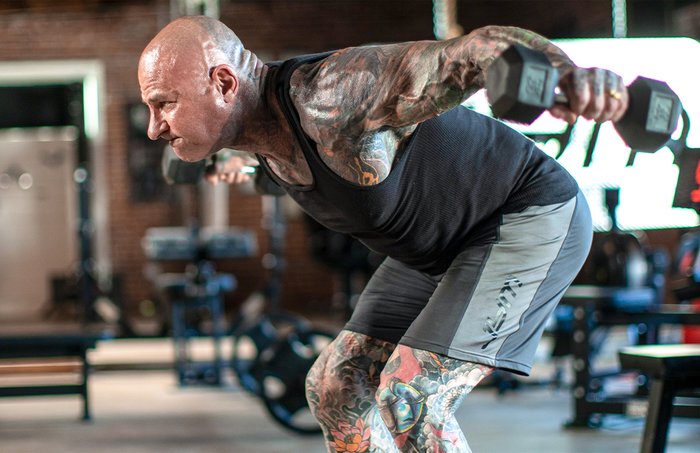
Bent-Over Dumbbell Lateral Raise Action Steps
- Stand, holding a pair of dumbbells, and bend forward at the waist, 45-90 degrees, with your back flat and your eyes facing the floor.
- Begin with the dumbbells hanging down, palms facing each other and elbows extended.
- With a slight bend in your elbows, contract your rear delts to lift the weights out and up until your upper arms are parallel to the floor.
- Hold the contraction for a count, then slowly lower to the starting position.
- You can also do this exercise on a flat bench or seat by leaning forward so your chest is nearly touching your thighs. Keep your back flat and start with the dumbbells together under your thighs.
4. Squat: Shortcut to Size, Weeks 1-12, Day 4
The Swap: Step-Up
Although I highly recommend that most people master the squat, I understand that there are times when it must be avoided. Whether you have to skip squats because you have an injury, you lack a barbell, or you're just downright scared to squat, you must know that the leg press is not a replacement. The biomechanics involved in squats and leg presses are markedly different. A proper squat maximizes your use of the hamstrings and glutes. In the finish position, the spine and legs are fully erect and the hips are at a 180-degree angle. In the finish position of a leg press, the hips are at 90 degrees, limiting the involvement of the hamstrings and glutes.
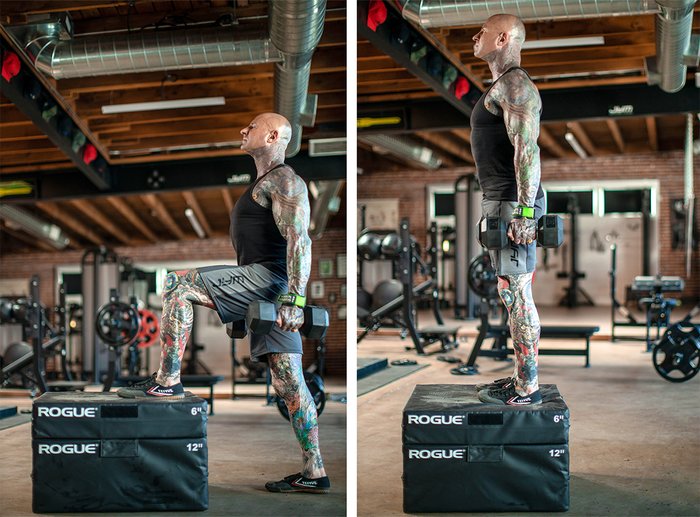
The step-up is essentially a one-legged squat, and you can do it with either a barbell or dumbbells. The key is to find the right surface to step up onto. Most people simply pick the closest bench, but that is usually not high enough. You want your working quad to be at least parallel to the floor at the beginning of the movement. Your best bet is to use a plyometric box—they're usually taller than benches. Pick one that's right around knee height.
Step-Up Action Steps
- Stand in front of the box holding either dumbbells or kettlebells at your sides or a barbell resting on your upper traps. Keep your eyes facing forward and your chest out for proper back alignment.
- Step up so that your entire foot is on the surface, then stand up, pressing down through your heel and pulling your trailing leg upward.
- When both feet are on the box, slowly move your trailing leg back down, emphasizing the negative motion.
- Alternate legs every other rep, or do all reps with one leg and then switch.
5. Leg Extension: Shortcut to Size, Weeks 1-12, Day 4
The Swap: Cable Leg Raise
The leg extension may be a great way to target the quads, particularly the rectus femoris, the muscle responsible for that front sweep of the quads, but it can also target the knees in a bad way. Due to the biomechanics involved, leg extensions can place a lot of shearing force on the knees.
The rectus femoris is the quad muscle that crosses both the hip joint and the knee joint. You can target it with safer exercises like the cable leg raise.

Leg extensions and leg raises may seem totally different, since the leg remains straight in leg raises while it extends and flexes during extensions. The key, as I alluded to above, is that both hip flexion and knee extension work the rectus femoris. Hip flexion is is the sole movement involved in leg raises, making it a great stand-in for leg extensions when you need quad isolation.
Cable Leg Raise Action Steps
- Set the pulley of a cable station to the lowest setting and attach an ankle strap to it. You'll want to use a relatively light weight.
- Facing away from the machine, secure the strap around one ankle and step forward so the weight is only a few inches off the stack. Don't step too far out, or you'll lose the vertical line of pull that's most effective for this exercise.
- Standing straight, execute the exercise by lifting your fully extended leg straight up and out in front of you until it's roughly parallel to the floor. Keep your body stable with a tight core and your hands on your hips.
- Lower your leg back down, and let it touch the floor slightly behind your planted leg.
- Feel free to re-establish your balance by putting weight on the working leg between reps.
- Complete all reps with that leg, and then switch legs and work the other one.
Want unlimited access to all of my programs and an endless supply of content like this? Visit JimStoppani.com and become a member.