
If your goal is to develop a strong, muscular back that looks as good as it performs, you'd damned well better place an emphasis on rows. The many variations of this simple movement pattern are the cornerstone of smart back training, and they facilitate myriad nonaesthetic benefits such as healthy shoulders and improved posture.
Unfortunately, many strength athletes have their priorities mixed up when it comes to back training. Let's get one thing clear: Chin-ups and pull-downs aren't rows. Devoting too much of your training volume to vertical pulling not only places undue stress on the shoulder joint due to the biomechanics of the movement, and it only targets a fraction of the musculature that horizontal rows are capable of hitting.
So yes, it's time to start cutting back on vertical pulls and start perfecting the row instead! This is the way to build a massive back while staying healthy in the process.
With so many variations to choose from, it can get confusing for even a seasoned veteran of the iron game. I've broken down the three most effective single-arm-row setups and detailed the differences between them.
Understanding the focus of each variation will help you program this back-training staple to yield results that are geared specifically toward your goals.
3-Point Single-Arm Row
If you are a novice lifter or have a history of lower-back pain and dysfunction, the three-point single-arm row provides the most stable setup to work from while also minimizing the shift and compensation at the hips and lower lumbar spine commonly associated with poor rowing mechanics.
The three points of contact are your foot on the ground, the opposite hand placed on the weight bench, and the entire length of your opposite shin in contact with the weight bench. This increases the total contact area, increasing the stability of the setup as a whole.
Aside from being a great way to teach and master properly executed single-arm rowing mechanics, this setup is an effective choice for secondary training days where you want to minimize the stress placed upon the spine and hips. With more emphasis placed on the dynamic movement itself, the exercise becomes more joint-friendly and targets the active muscles directly.
3-Point Single Arm Dumbbell Row
Watch The Video - 0:30
Coaching Notes
- Position yourself with your left knee on the bench, with the shin in full contact and the ankle crease against the edge. Straighten your left arm and place your left hand on the bench.
- From this stable position, grab the dumbbell with your right hand, ensuring that your base is stable by activating the core, glutes, arm, and right leg.
- Row the dumbbell back, activating at the lats and focusing on "squeezing" the dumbbell back to your hip—not driving the elbow straight up, as is commonly (and incorrectly) practiced.
- Tense your body and hold the top of the range of motion for a split second. Then, control the eccentric lowering portion until your arm is in a straightened position at the elbow.
- Throughout the reps in a set, maintain constant tension in the muscles of your back, and work hard to create smooth and coordinated motions up and down.
Symmetrical-Stance Single-Arm Row
The symmetrical-stance single-arm row provides the opposite setup of the three-point stance. Since both feet are underneath the hips, and the core and the spine are parallel with the floor, the symmetrical-stance row challenges the core to resist rotation throughout the movement.
This variation is great for high-performance athletes and other functionally minded lifters who want to kill two birds with one stone in their training. It's also the most challenging of the three variations here—if you don't believe me, stay strict on your form and see how your core activity increases as the weights go up.
While this variation is great for linking up the kinetic chain, it absolutely limits the top-end loads that you're able to move and control. If you're more aesthetic and strength-minded, perform one of the other two options.
Symmetrical Stance Single Arm Row
Watch The Video - 0:28
Coaching Notes
- Place your feet in a power stance just below your hips with your toes pointing directly forward.
- Using the hip-hinge motion, push your butt back, and bend at the knees slightly to set your hips and spine in a perfectly stable position.
- Place one hand on the weight bench or any other elevated surface and maintain a straight elbow position. At this point, your spine should be parallel to the ground.
- Pick up the dumbbell with your other hand, and begin to row back toward your hip without altering your base of support at the hips, supporting arm, or legs.
- Maintain a coordinated and smooth rhythm of the row throughout the set. Place your focus on maintaining a properly aligned core position throughout the set.
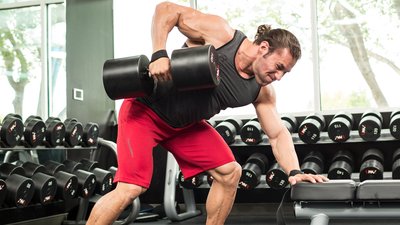
Split-Stance Single-Arm Row
If you're a serious strength or aesthetic athlete who wants the best strength-and-hypertrophy stimulus possible, I recommend mastering the split-stance single-arm row setup for a few key reasons.
First, it allows just enough core and pillar involvement to be deemed "functional" and transferable to other major lifts or activities. Second, due to the angle of the torso during this movement, you will be able to load this variation up heavy while still maintaining a stable, neutral spine. And lastly, due to the split-stance setup, the hip on the active rowing side (back hip) remains slightly higher than the opposite-side hip, creating a pre-stretch in the lats. This pre-stretch really activates the entire lat and places it in a position to do some major work.
My favorite feature about this setup is that it also stretches the lat at the bottom of the range of motion by letting your shoulder blade protract and upwardly rotate. This end-range accentuated stretch will allow a greater range of motion that is crucial for mobility maintenance and expediting the pump to the active muscles.
All of the variables can also be manipulated to tailor this staple rowing movement to your body and your goals. Take the time to find the perfect setup for your anatomy, and then further manipulate those variables to keep progressing.
Split Stance Single Arm Dumbbell Row
Watch The Video - 0:35
Coaching Notes
- In a split stance, position your front leg facing forward with a slight bend in the knee while your back leg is semistraightened, with your toes pointing out at an angle to open up and elevate the back-side hip.
- To elevate the hip and achieve a pre-stretch of the lat, rotate the rowing-side hip up slightly, causing your toe to point more directly out to the side.
- Place your opposite arm on a stable surface such as a weight bench or dumbbell rack (as long as you're not in anyone's way). To manipulate your torso angle, use higher or lower surfaces for your arm support.
- From this stable position, grab the dumbbell and row back toward your hip. Let your shoulder blade rotate freely around the thoracic cage, accentuating the range of motion used during the row.
- Allow your thoracic cage to rotate slightly upward during the pull phase of the motion and forward during the lowering phase.
- Aside from the scapular and thoracic-cage movement, use minimal additional momentum. Keep it strict and controlled.
- This is a more advanced variation than it often gets credit for, so master the three-point stance before trying it.