
When it comes to strengthening and developing the muscles of the core—and especially the front of the core, such as the obliques and the rectus abdominis—most people revert to run-of-the-mill exercises. Unfortunately, the standard go-to movements, such as sit-ups, crunches, and weighted side bends, leave plenty to be desired.
For many people, they're just too easy—hence the need to do them in sets lasting dozens of reps. For plenty of other people, they're nearly impossible to do without putting the spine at risk. And honestly, even when performed perfectly, they do little to nothing to actually make you stronger.
Need proof? Try any of the movements on this list. Each one will produce a deep ache that perhaps you haven't felt in a while. All of a sudden, you'll be much more aware of every inch of your core anatomy—and reminded in no uncertain terms that your core could still be stronger.
Here are my favorite exercises that turn your obliques and six-pack muscles—and overall core—into a sculpted pillar of strength!
1. Plank with Single-Arm Banded Row
This harder-than-it-looks take on the plank is a tremendous core-stability movement that trains the body to resist both extension and lateral flexion of the spine. It also strengthens the upper-body ''pulling'' muscles, such as the scapula and shoulder stabilizer muscles. In other words, it gives a solid dose of what gets skipped in far too many training programs.
If you are performing this exercise correctly, your weight should remain equally distributed on both feet and your body should not move at all. You will commonly see people shifting their weight from foot to foot, and their body rocking from side to side. This is often a reflection of poor stability in the lower back and pelvis—and a sign that you need this movement more than most.
Directions:
- Fasten a resistance band around a secure bar. Choose a tension that allows you to maintain proper form for the duration of the exercise. It shouldn't be a struggle to do just a few reps!
- Get into a high plank position, setting your feet hip-width apart, and grab the band with one hand. Set your body so it is in a straight line from your head to heels, and tuck your chin. Before each rep, take a deep breath in through your nose, brace your core, tuck your ribcage down toward your hips, and squeeze your glutes.
- Perform a rowing movement, initiating the movement with the muscles in your mid/upper back, not your arm. Your elbow should remain tight to your side and should not flare out.
- Use the muscles in your mid/upper body to control your arm as it returns to the starting position. Make sure you do not allow your lower back to hyperextend, ribcage to flare, or the band to lose tension at any point during the exercise.
Prescription: 3 sets of 8-12 reps per side
Modification/Progression: You can make this exercise easier by using a band with less tension or by placing your feet farther apart. You can make it more challenging by using a band with more tension or by placing your feet closer together.
2. Tall Kneeling Single-Arm Landmine Press
The tall kneeling single-arm landmine press trains the body to resist the extension and rotation of the spine, and remain in a fixed position even while the arm moves. Sound familiar? It's like the mirror opposite of the plank band row, only from the criminally undertrained kneeling position. If you can't keep your pelvis and spine from rotating or collapsing, then this movement is exposing lumbo-pelvic instability that you need to address!
Directions:
- Set up a barbell so it is in line with your armpit, and get into a kneeling position. Your knees should be roughly hip-width apart. Your head, torso, and hips should be in a stacked position.
- Before you perform a press, take a deep breath in through your nose, brace your core to 5-6 out of 10, tuck your ribcage toward your hips, and squeeze your glutes.
- Press the weight up with control, and ''row'' it back down to the starting position. Your lats and scapula stabilizers should play a big role in the lowering phase of this exercise. The barbell and your arm should travel in a straight line and should remain in line with your armpit. Do not allow your lower back to hyperextend, ribcage to flare, or torso, spine, and hips to rotate.
Prescription: 3 sets of 8-12 reps per side
Modification/Progression: You can this exercise easier by using less weight or by adopting a standing stance. You can make this exercise more challenging by using more weight, adding additional band resistance, or performing negative reps and taking 3-5 seconds to lower the barbell toward your body.
3. Band-Resisted Dead Bug
This band-resisted core stability exercise strengthens the muscles of the anterior core and trains the body to resist the extension of the spine. If you are performing this exercise correctly, your abs will be on fire!
Directions:
- Tie a resistance band around a bar. Choose a tension where you're able to maintain proper form at all times.
- Lie on the floor. Place the band around both of your wrists and extend your arms so they are straight, with your hands over your chest. As you do this, you should feel your ribcage tuck down toward your hips, and the front of your core activate.
- Extend your legs so they are in a vertical position, straighten your knees, and flex your feet toward you. Take a deep breath in through your nose.
- Fully exhale through your mouth, contracting your anterior core muscles as hard as you can, and slowly lower one leg toward the floor. Return to the starting position.
- Reset and repeat with the opposite leg. It is very important that you do not allow your lower back to hyperextend or ribcage to flare.
Prescription: 3 sets of 5-10 reps per side
Modification/Progression: You can make this exercise easier by using a band with less tension, or no band at all. You can also shorten up the range of the leg lowering. You can make this exercise more challenging by using a band with more tension, or by increasing the range of the leg lowering.
4. Half-Kneeling Band-Resisted Pallof Press
This band-resisted exercise strengthens the muscles of the anterior core, most notably the obliques, and trains the body to resist the rotation of the spine. You may have seen people performing similar movements with a cable stack, but the band gives a unique level of difficulty worth trying.
Directions:
- Get into a half-kneeling position. In this variation, you will place your outside leg so it is ahead, and kneel on your inside leg.
- Attach the band so it is about chest height. When you extend your arms, the band and your arms should form a 90-degree angle, so position your body accordingly. Place your hands on top of each other, as this makes the body more symmetrical. Before you extend your arms, take a deep breath in through your nose.
- As you extend your arms, forcefully exhale, tuck your ribcage toward your hips, brace your core to 7-8 out of 10, and squeeze your glutes. Hold your arms in the extended position for 1-2 seconds before you bring them back to the starting position.
- Bring your arms back in toward your body, stopping when your elbows touch your sides. Do not allow your hands or forearms to touch the front or sides of your body. It is very important that you pay attention to your alignment for the duration of the exercise. Do not allow your lower back to hyperextend, ribcage to flare, or your body to twist or tilt laterally. Your head, torso, and hips should remain in a stacked position, and your femur and knee should remain stable.
Prescription: 3 sets of 5-10 reps per side
Modification/Progression: You can make this exercise easier by using a band with less tension, kneeling with your inside leg ahead, or adopting a standing stance. You can make this exercise more challenging by using a band with more tension, or by performing a more advanced variation where you extend your arms for 1-2 seconds, lift your arms for 1-2 seconds, lower your arms back down, and return to the starting position.
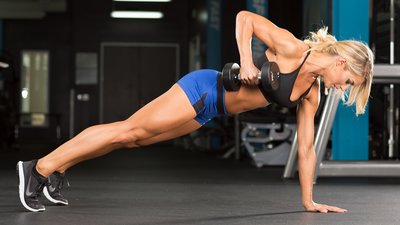
5. Renegade Rows
Looking for ab movements that provide maximum bang for the buck? The renegade row strengthens the muscles of the mid/upper back and arms, scapula and shoulder stabilizers, and the deep and anterior core. It also trains lumbo-pelvic stability. But it only does all that if you do it correctly!
When performing this movement, your entire body should remain in a fixed position—except for your moving arm, of course. Most transfer their weight from foot to foot, and their body rocks from side to side. Hold tight, bear down, and keep still!
Directions:
- Get into a plank position. Your shoulders should be directly above your hands, your body should form a straight line from your head to heels, and your head, torso and hips should be in a stacked position.
- Before each rep, take a deep breath in through your nose, brace your core to 7-8 out of 10, tuck your ribcage down toward your hips, and squeeze your glutes.
- Perform a single-arm row and try to initiate the movement with the muscles in your mid/upper back, not your arm. Do not allow your elbow to flare out—it should remain close to your side.
- Lower the weight with control, reset and repeat the breathing and bracing, and perform the row with the opposite arm.
Prescription: 3 sets of 5-10 rep per side
Modification/Progression:You can make this exercise easier by using a lighter weight, or by placing your feet wider, up to shoulder-width apart. You can make this exercise more challenging by using a heavier weight, or placing a weight plate or chains on your mid back. You can also position your feet so they are closer together, or you can elevate your feet on a bench or box.