
Anyone who's been lifting for a while knows that work and power are two parameters that are often discussed with respect to weight training. Some training programs focus on work as a parameter that must be increased over time whereas other programs insist that power is the parameter that must increase.
Indeed, work and power are both intimately related to the intensity and volume that we use in our training. Question is: How are they related? Also, how does the training volume we choose affect the level of work and power we perform while training? In the following sections, I will attempt to provide answers to these questions.
Another important question is: How is muscular overload affected by work and power? Generally speaking, we want to increase the level of work and power performed during our training so as to overload our muscles. We all have a deep-seated hunch that increasing the weights that we lift increases the level of work and power that we perform.
Can we be certain of this? For instance, you might assume that performing 1 set of 10 repetitions with your 10 rep-max (RM) weight involves more work than performing 1 set of 15 reps with your 15RM weight.
Guess what? Even though the 15RM load is less than the 10RM load, the 15RM load requires more work during the set of 15 reps. Moreover, if you lift the 10RM load more slowly than you did the 15RM load, the power you perform with the 10RM load may be lower than with the 15RM load. Clearly, we need a way to effectively apply work and power to our training.
In Part 1 of the series, entitled "Physics and Training with Weights," we'll take a closer look at the concept of work, and how to analyze the work performed in your training.

Overview Of Work
Work is a measure of the amount of energy expended by a force as it operates over a distance. The equation for work is given by

where W is the work, F is the force, and D is the distance. Applying this to weight lifting, whenever you apply a force to lift a weight upwards you perform work on the weight. For example, imagine you lift a 5-lb weight upward by a distance of 1 ft, as shown in Figure 1. According to Eq. (1), the work you perform on the weight during the lift is

Thus, the work you performed in lifting the 5-lb weight is 5 ft-lbs. Also note that when you lift a 1-lb weight upward by a distance of 5 ft, the work performed is also 5 ft-lbs.
Call me old-fashioned, but even though the convention is to use the metric, SI system of units, I like to use the English system, especially because all my weights are labeled in Pounds (lbs). Of course, everything we'll be doing in the following sections can be expressed in terms of the SI system, if you prefer, so long as you keep things consistent throughout.
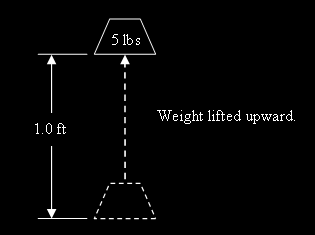
Figure 1: A 5-lb Weight Lifted 1 ft Upwards.
At this point, you may be wondering what happens if you lift the weight upwards, but also move it to one side or the other. This sideways movement has no bearing on the amount of work performed simply because the force you apply to the weight is still directly upwards. Herein, we'll be primarily concerned with the work performed while concentrically lifting weights. Although work is also performed while lowering weights (i.e., eccentric repetitions), we won't be dealing with that for the time being.
One interesting thing about Eq. (1) is that when D = 0 ft, the work done is also zero. This suggests that while holding a weight stationary (e.g., isometric contractions), the work done is zero, no matter how heavy the weight. Indeed, although the work performed by your muscles on the weight is zero, the work performed on the level of muscle fibers is not!
While you hold the weight, many of the fibers comprising your muscles are contracting so as to produce a total force in opposition to the weight you're holding. Hence, individual muscle fibers are performing work while you hold the weight stationary. As an increasing number of muscle fibers become fatigued, holding the weight will become more difficult.
You'll eventually have to put down the weight. The take-home point is: even though you're not moving the weight, and thus Eq. (1) says no work is being done on the weight, your muscles are still performing work in order to produce an output force. In order to use Eq. (1), however, we'll have to stay away from isometric contractions.
Another interesting thing about Eq. (1) is that it suggests that the more weight you lift, the more work you perform. Equation (1) doesn't distinguish between reps and sets. Thus, you can perform an increasing level of work by increasing the weight you can lift in one set, or by increasing the total number of reps you can perform with a lesser weight for several sets.
Work Performed During A Set
Now let's use Eq. (1) to express the work performed during a set. To do this, let's recast that equation in the form
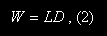
where W is the work performed during a single set of lifting, L is the load we're lifting, and D is the total distance traveled by the load during the set.
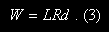
Note that D is not limited to the distance the load moves during 1 repetition. Rather, D is the sum of the upward distances the load moves throughout the entire set. For example, suppose that when you perform 1 rep of Squats, the load moves 2 ft upward.
Then, if you perform 10 reps, the distance D is 10 x 2 ft = 20 ft! Therefore, let's define D = Rd, where R is the total number of reps performed during a set, and d is the upward distance the load moves during 1 rep. Equation (2) can now be written as
Let's make another simplification to Eq. (3). For a particular lifter who's performing a particular exercise, the distance d doesn't change from rep to rep. Thus, d is essentially a constant value. So let's go ahead and set d = 1.0 ft for simplicity's sake:

Doing this doesn't make our equation for the work wrong, but it does produce some constraints. The good news is that setting d = 1.0 ft normalizes things so all lifters can use the same equation, despite them having different values for the distance d. This also makes it easier to apply Eq. (4) to any exercise, even though d actually varies widely among different exercises.
The bad news is that without knowing specific values for d, we won't be able to compare the "total work" performed by different lifters, nor will we be able to compare an individual lifter's "total work" for different exercises. On the other hand, we can compare different lifters and exercises so long as we remember that we're comparing values for the work performed "per linear foot" that the weights move. These constraints are a small price to pay for the simplicity of Eq. (4).
We can make things more convenient by expressing the load L in terms of fractions of your 1RM weights. For any exercise that you perform, the RM weight that you lift can be viewed as a fractional value of the maximum weight that you can lift one time. This fractional value can be used to express the load you're lifting in terms of your 1RM weight:
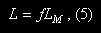
where L is the load, f is a corresponding fraction of your 1RM, and LM is your 1RM weight. Substituting the right-hand side of Eq. (5) for the load L in Eq. (4) gives

You'll notice that I've normalized the 1RM weight to unity (i.e., set LM = 1.0 lb). Doing this eliminates the need to consider a variety of individual 1RM-weight values that would no doubt arise within a group of lifters. This enables a group of lifters exhibiting different levels of performance to use the same equation.
Equation (6) is the equation we'll use to analyze the work performed during our training. The easiest way to do this is by graphing Eq. (6) for a variety of f and R values, as follows.
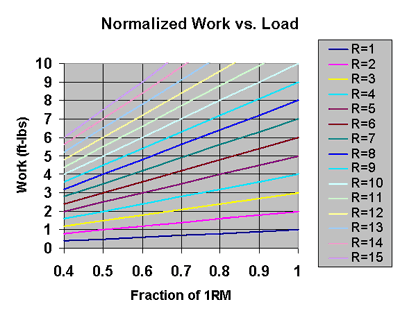
As you can see, this Work versus Load graph has a vertical set of values, a horizontal set of values, and several colorful lines. The vertical values are the work performed during a set having a particular number of reps. Strictly speaking, the vertical values are the work per linear foot performed during the set, as discussed above. We need not be concerned with the linear foot part unless we intend to compare work values among different exercises and/or different lifters.
The horizontal values are the fractional values f of your 1RM weight. Note that fractional values less than 0.4 are omitted because most people don't train with such light weights!
Each of the colorful lines illustrates the relationship between the load lifted and the work performed during a set having a particular number of reps R. A legend on the right-hand side of the graph identifies the number of reps associated with each line.
For example, take a look at the dark-blue line at the bottom of the graph. According to the legend, the dark-blue line represents 1 repetition (i.e., R = 1). The next line up in the graph is associated with 2 reps (i.e., R = 2); and the next line after that is associated with 3 reps (i.e., R = 3), and so on. The general trend is that the work performed increases whenever you increase the load and/or number of reps performed.
Ideally, the colored lines shouldn't stretch across the entire width of the graph. Rather, each line should stop when it reaches the RM value with which the line is associated.
For example, the R = 10 line should stop at the fractional value representing your 10RM weight, and the R = 12 line should stop at the fractional value representing your 12RM weight. This is illustrated in the following graph.
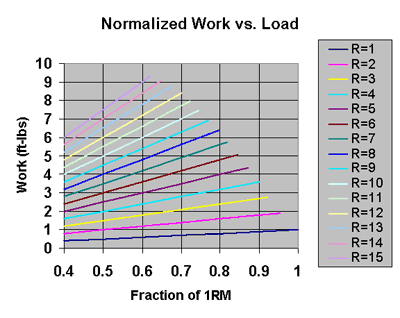
As you can see, each line stops at the fractional value corresponding to the RM weight that can be lifted for R reps. For example, notice the R = 8 line. That line stops at a fractional value of 0.8 because you generally cannot perform more than 8 reps with 80% of your 1RM weight [1].
Problem is: not everyone's fractional values are necessarily the same [2-3]. For instance, one lifter's 10RM weight may be 0.75 of 1RM whereas another lifter's might be 0.78 of 1RM. When you create your own graph, stopping the lines at your RM values will make your graph a bit easier to understand. As we shall see, however, allowing the lines to stretch across the entire width of the graph can be useful when calculating the work performed during multiple sets.
Comparing Work Performed In Different Sets
Recall that I mentioned that you might assume performing 10 repetitions with your 10RM weight involves more work that performing 15 reps with your 15RM weight. I pointed out that although the 10RM load is heavier, the 15RM load requires more work during the set of 15 reps.
Let's use Eq. (6) to see how this is determined. Note that your 15RM weight is roughly 62.5% of your 1RM weight, and your 10RM weight is roughly 75% of your 1RM weight [1]. Thus, the fractional values are 0.625 and 0.75, respectively. Using these fractional values in Eq. (6) gives

where we included the units ft-lbs in parentheses to remind ourselves that we're dealing with work values. Clearly, you'll perform more work by doing 15 reps with your 15RM than by doing 10 reps with your 10RM. This is so even though your 10RM weight feels considerably heavier than your 15RM weight. This suggests that perceived effort and work are not synonymous!
Suppose that you want to use your 10RM weight, but you want to perform the same work as you would by doing 15 reps with your 15RM weight. Is this possible? Well, yes; but only if you perform another set of about 3 reps. Let's use the following graph to see how this works.
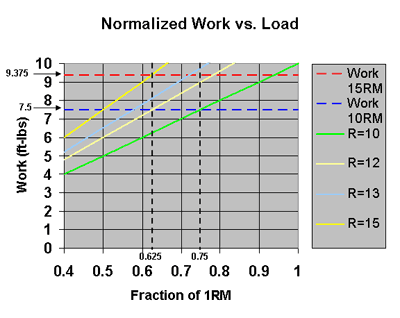
This is the same graph as before, with the exception that I've removed some lines that don't concern us and added some dashed lines to simplify using the graph. As you can see, all the original colored lines are gone except those for R = 10, 12, 13, and 15 reps.
Notice the vertical dashed line representing a fractional value of 0.75. The location where the 0.75-line crosses over the green line represents the end of your 10-rep set. At that point, you've performed 7.5 ft-lbs of work, which is represented by a horizontal, blue dashed line. The work you want to perform is represented by the intersection of the 0.75-line and a horizontal, red dashed line, which represents 9.375 ft-lbs.
Now take a look at the light-yellow line; it represents 12 reps (i.e., R = 12). The location where the light-yellow line crosses the 0.75-line is the work you'll perform by doing a total of 12 reps with your 10RM weight. As you can see, the location where the light-yellow line crosses the 0.75-line is below the red dashed line. This tells us that you'll have to do a bit more than a total of 12 reps with your 10RM weight if you want to perform 9.375 ft-lbs of work.
Just above the light-yellow line is a light-blue line which represents 13 reps (i.e., R = 13). The light-blue line crosses the 0.75-line at a location well above the red dashed line. This implies that doing a total of 13 reps with your 10RM will put you a little above 9.375 ft-lbs of work. Therefore, you'll have to do a first set of 10 reps, followed by a second set of 3 reps in order to perform 9.375 ft-lbs of work.
Equivalently, you could perform 8 reps in the first set and then perform 5 reps in the second set. The way in which you divide the reps between the two sets has no bearing on the total work performed so long as you're lifting your 10RM load for a total of 13 reps.
Although analyzing 2 sets totaling 13 reps may seem simplistic, the techniques presented can be very useful for analyzing the level of work performed throughout a training program. Of particular interest is how the work changes when you switch to different rep-ranges within a training program. Finding this out is an objective of a future part in this series.
Closing Thoughts
In the preceding sections, we reviewed the physical concepts underlying work. I then demonstrated simple techniques for applying the equation for work to our training. This was accomplished by simplifying the equation to make it more training-specific and then using simple graphical methods.
Graphs are particularly useful because then enable you to get a "bird's eye" view of an entire spectrum of your performance. Graphs also enable you to see more clearly how various training parameters change relative to one another, and thus you can see how they ultimately affect the progression of your training.
One thing that became readily apparent is that work doesn't distinguish between reps and sets. The level of work that you perform is affected only by the total number of repetitions that you perform, and has nothing to do with the number of sets. This implies that you can perform an increasing level of work by increasing the weight you can lift in one set, or by increasing the total number of reps you can perform with a particular weight for several sets.
In Part 2, we'll take a look at the concept of power and techniques for analyzing the level of power you perform in your training. As you'll find, an interesting thing about power is that simply hoisting heavy weights for more and more reps and sets does not necessarily increase your power output. The time spent during each set must be taken into account, as well. The longer it takes you to lift a weight, the lower your power output is for the lift.
References
- Hatfield, Frederick C., Fitness: The Complete Guide, International Sports Sciences Association, 7th Ed., p. 5.18.
- Ridgely, Charles T., "Determination of Repetition Maximums," Bodybuilding.com, February 2004, [ online ]
- Ridgely, Charles T., "Creating a Repetition Maximums Calculator," Bodybuilding.com, October 2004, [ online ]