
Introduction
No matter what sport you participate in, the vertical jump is a standard test applied to almost all athletes. To this day, it remains as one of the most simplistic, yet accurate, methods of measuring lower body power. There is often a positive correlation between one's vertical jumping ability and sprinting times. Therefore, scoring well on this test is a good thing for virtually any athlete interested in speed and power development.
The obvious question then becomes, "How does one increase their ability to jump higher?" There are many methods available, but one of the most advantageous, yet neglected, is mobility training. Often coaches like to first recommend drills such plyometrics, Olympic lifts, power lifts, and even core training. While these methods all have their place, mobility training may have the most profound and immediate effect!
 |
Increase Your Vertical Jump Dr. Squat guides you through a 21 week workout program with exercises and printable logs to increase your vertical jump. [ Click here to learn more. ] |
All of the above-mentioned methods of improving an athlete's vertical jump are based on having a greater ability to: exert force, exert force quickly or have a good foundation in which to display force. Each of these attributes is important. However, if your body is incapable of transferring these qualities to sports performance, the methods become useless.
Mobility training, in contrast, emphasizes the ability to move the body as effectively as possible. As a result, through mobility training, coaches and athletes can more efficiently implement the training methods above making them useful tools in any program.
The problem arises in identifying which mobility drills are most appropriate for each individual. While this is impossible to accomplish in one article, there are a number of common restrictions that I have found in the many athletes I train. Restoring movement to these joints and areas of the body has allowed these athletes to notice immediate improvements in their performance.
Before going any further it is important to emphasize that mobility training is NOT the same as flexibility training. When we generally speak of flexibility training we are talking about improving muscle elasticity to allow for better movement of the joint and surrounding musculature. This is the biggest difference between traditional stretching (i.e. flexibility training) and mobility training.
It is common in this day and age of training to try to correct many poor movement patterns through stretching. While this sometimes may result in some improvement, many times the limitations are due to the Central Nervous System (CNS).
There are many types of mobility training, but for our purposes we are going to be speaking of one in particular, Z-Health™. This system of mobility and movement training is the compilation and creation of Dr. Eric Cobb (www.zhealth.net). The Z-Health™ system was created with the influence of many other systems such as Fledenkrais, Somatics, Martial Arts, and Yoga. It can also not go without saying the influence of great coaches like Scott Sonnon, Tony Blauer, Dr. Karl Lewit, Dr. Vladimir Janda and many others. So, the Z-Health™ system is well founded both in clinical testing and practical application.
Where Z-Health™ differs greatly from so many other forms of movement enhancement is its focus on the CNS. By realizing that the CNS has one of the biggest influences over our movement strategies we can now work on re-educating the nervous system on the most efficient ways to move. Over time and due to injury, bad habits and lack of use, we have retrained our CNS to less then ideal body biomechanics.
The initial exercises prescribed involve learning how to isolate and control each joint complex through all of its ranges of motion. Because one of the main goals of Z-Health™ is better mobility through nervous system enhancement the exercises begin back in the cognitive stage of learning. From there the goal is to complicate the training and begin to integrate several joint complexes. This is exciting as you watch how quickly the body will begin to develop new movement capabilities.
For the sake of this article, we will cover only a few isolated and integrated drills that will address some of the more common problem areas.
While performing all drills make sure to follow these rules:
- Never work into ranges of motion that cause pain.
- Always work from good postural alignment.
- Move super slowly through the movement when first learning the drill.
- The quality of movement is far more important than the quantity of repetitions performed. One repetition perfect is better than five that are only OK.
- Always try to rid tension from the body while performing the drills, never try to muscle the movements. Remember, this is efficiency, not muscle training.
The Exercises
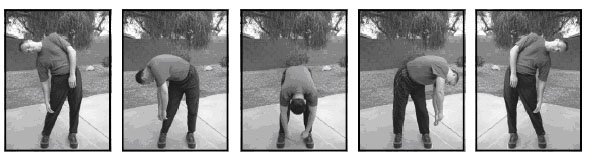
Scorpion
The Scorpion is a key drill because of its ability to not only improve the movement of the hip joint, but to release the thoracic spine as well. The iliopsoas, hip flexors, are commonly tight from sitting and running. If they become restricted they will prevent hip extension which is crucial in proper jumping mechanics.
The throacic area of the spine is crucial for allowing full extension of the trunk and arms. The Scorpion can also be used with PNF methods to increase the effectiveness of the movement.
Performance Cues:
- Lie on stomach with arms straight out away from your sides.
- Let the head rest on the ground facing either direction.
- Pick up the leg one the same side as the head is facing.
- Try to place the leg onto the opposite side of the body toward the opposing hand.
- Point the knee toward the sky and allow gravity to open up the hip.
- Exhale and try to relax into the movement while keeping the chest on the ground.
Note: The pictures included in this article are taken with permission from
Dr. Eric Cobb's manual. Z-Health™ Level One Essentials Trainer Certification.
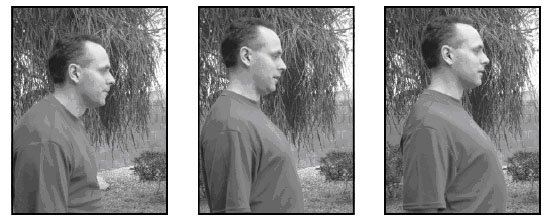
Lumbar Circles
This drill has been phenomenal in relieving many people's complaint of low back pain while increasing performance. If the low back is restricted, a coach or athlete will generally see compensation in the lower body as well. This is also a valuable drill to see excessive tension being held in the neck and shoulders.
- Stand with feet in neutral position.
- Try to stand as tall as possible in good postural alignment.
- Always move very slowly with this drill initially to try to work through compensation strategies.
- Allow the body to fall to the side, then slowly down the body.
- One of the performance goals is to release tension not only in the low back, but in the shoulders and neck as well.
- As you slowly circle in the front of the body try to keep the eyes looking toward the midline or through the knees.
- Return to the start position without speeding through any specific range of motion, and remember to keep the head, neck and shoulders relaxed like a rag doll. The motion is guided by the lumbar spine, not the head.
 Click here to enlarge the image.
Thoracic Anterior/Posterior Slide
Since the spine is a complex joint, any limitations in movement will cause compensation down the chain. One of the more common areas of restrictions is the thoracic area. Lack of movement can deter from proper arm swing during running and jumping activities as well as compensation in the lower body.
- Always maintain good postural alignment avoiding movement by the neck and/or shoulders. Remember, we are isolating the thoracic spine!
- Place a finger on the sternum to provide feedback when learning the exercise.
- Slowly move away from your finger by compressing the chest. If you start to move to the point where you move the shoulders, neck and tense the abs/face you have gone too far. A little correct movement is better then a lot of incorrect motion.
- Once you have reached your limit, now move the sternum into the finer. This will be expansion of the chest. Do not raise the shoulder, but focus on lifting the sternum up and out.
 Click here to enlarge the image.
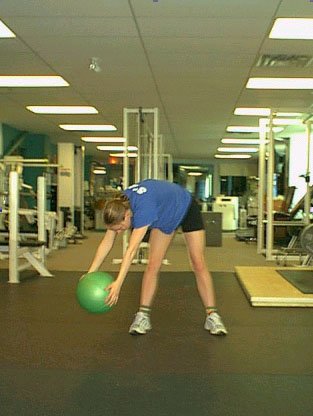
Hip Circles
It is hard to argue that the hip may carry the most influence on one's movement capabilities. Since we live in an age of chairs and long hours of sitting, tight hips are commonplace. Often when I see individuals perform hip mobility work I see constant cheating and compensation taking place. This weakens the effectiveness of the drill which in the long run will prove more frustrating.
If you take the time to work the movement then make the outcome one of desired value. When executing all drills make sure to follow the above mentioned guidelines.
Another key component is to work the hip through all ranges of motion. Since the hip is also a complex joint, it has many planes and ranges of motion in which it will use. Therefore, not training all the different movements will hinder the performance benefits the user will seek.
The drill demonstrated below is more complex than the beginning drills I often use. It combines all ranges of motion, in front of the body, to the side of the body, behind, and across the body. These circles must pass through all planes and be done in both directions.
Performance Cues:
- Maintain good postural alignment throughout. It will be especially easy on this drill to focus attention on the foot. Instead focus your eyes straight ahead trying to avoid any compensation in the head, chest, shoulders and pelvis.
- Lift the foot slightly off the ground to begin, many will find just being on one leg challenging.
- Lock the leg straight (unless you have medical reasons not to lock the leg) and focus on circles in all four points while only moving the hip. Bending of the knee is a common compensation strategy for poor hip mobility.
- Try to perform the circles in super slow motion first and keep the body relaxed. Always minimize all tension through the body.
Click here to see how the Hip Circles are done.
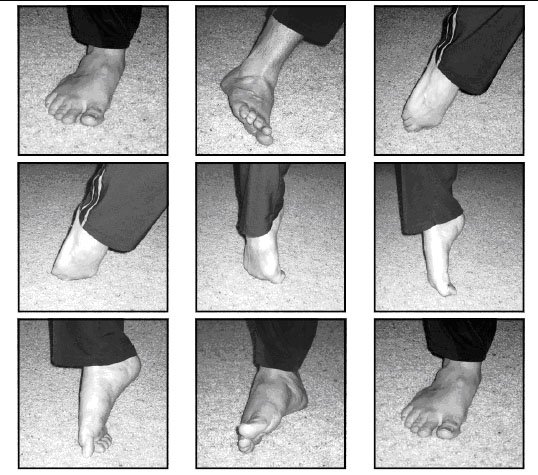
Foot Rolls
The most commonly overlooked area of the body is the feet. While sport is absolutely brutal on the ankle and foot, almost no coach or athlete works to train the feet. This is comical considering force is first transmitted up through the feet.
In addition, all movement is based upon the level of efficiency of joint recruitment, therefore, feet become crucial. The fewer number of joints that are utilized during movement the lower the quality of that specific movement.
Since the feet/ankles have such a high number of bones, not taking the benefit of implementing them is a mistake that can and usually will eventually lead to injury. However, this is what we often do when we have athletes taped, braced, in thick shoes and high tops. To restore proper mechanics of the feet/ankle foot rolls are perfect!
Foot rolls allow for movement again in all planes of motion and can quickly provide insight into the amount of influence they have. Often foot rolls cause extreme discomfort, which is a good sign that a lot of mobility has been lost.
Since our goal is performance improvements and not pain we want to follow the initial guidelines in performing all drills. With foot rolls especially, you want to watch for increased tension throughout the body including the face. Try to minimize such tension and work to slowly increase the mobility.
Performance Cues:
- Stand in good postural alignment to begin the drill.
- Place a soft surface underneath the feet to minimize the discomfort and release tension that will be experienced.
- Gently begin to roll the foot laterally away from the body. Make sure that the heel stays in contact with the ground at this point.
- From here, slowly begin to circle around from the outer edges of the foot.
- While circling make sure to curl the toes underneath the foot.
- Begin to push through the top of the foot to fully open all the joints.
- Allow the knee to travel toward the body's midline as you circle around.
- Try to end with the heel touching the ground last
 Click here to enlarge the image.
Conclusion
The hardest aspect of implementing these drills is the discipline it takes to get the most out of them. When you perform the drills you will not have bigger arms or pecs, but you will have improved in every performance aspect you strive to achieve. As world-renown performance coach, John Davies, said "the one thing is everything."