
If you are new and haven't heard yet, one of Coach Davies' many drills for increasing proprioception and agility includes tumbling. I have written several articles in the past that specifically detail a safe and effective tumbling progression that will increase your skills and kinesthetic awareness.
Since there are so many new readers at The Code, I wanted to provide a brief summary of this progression. So, to all the new Renegade brothers, sisters and readers of The Code ... welcome! Many, many exciting things are in store for the future! You aren't going to want to miss anything!
First Steps
I'll start at the beginning and work my way through half of the basic exercises. Since this article is a summary, however, each tip will be brief. Feel free to refer to Renegade articles listed online. Or, if you have more questions, you are always welcome to send me an email!
Exercises
In Coach Davies' book, "Renegade Training for Football," he appropriately starts with the forward roll to stand. Here are the pointers:
- Start in a standing position.
- Squat down, placing your hands on the floor.
- Looking at your stomach, gently propel your body forward.
- Roll over your back.
- Throw your hands forward at the end to aid in momentum.
- Stand up, or do a tuck jump or star jump at the end.
The next exercise is the backward roll to stand. Here are its pointers:
- Start in a standing position.
- Squat down, placing your hands on the floor.
- Use your legs to push you backward and keep them tucked closely to your body as you roll over your back.
- As soon as possible, push off the floor with your hands, which should be ready next to your ears.
- Keep your body tucked while pushing your weight off of your neck and head.
- Land on your feet and stand up, again performing a tuck jump or star jump at the end.
Next, you should learn the tripod to headstand.
- Start in a kneeling position.
- Create a triangle with your hands and top of your head. Your hands should be shoulder width apart.
- Position your right knee on top of your right elbow. Repeat on the left side.
- You should now be comfortably "crouched" upside down, with only your hands and head making contact with the floor. Your weight should be evenly distributed.
- Once that position is comfortable and consistent, extend your knees and hips completely until they are in a neutral position. You should now be comfortably "extended" upside down.
- To roll out of it, extend your arms and allow yourself to roll down your back. Remember to tuck your head and knees, throwing your hands forward for the necessary momentum.
- Stand up or do a jump at the end.
Speaking of "newness," my A&M tumbling classes are only in their fourth week of the semester and have a long way to go. To give you an idea of an appropriate time frame, in terms of progression, we are just now starting front cartwheels. I wanted to take the opportunity today to emphasize a point I have made in my past articles.
Here it is: you must have a good headstand and handstand before you can work on the cartwheels! I always have a few students that have problems with the cartwheels, and it is, without exception, the same students who are having troubles with their handstands and handstand forward rolls. If you are at this stage, please do yourself a huge favor and focus on the points I've presented. You'll learn much more quickly and hopefully get rid of some of the frustration you may be feeling if you've been using tumbling in your training.
Remember, Renegade athletes work hard, but they must also work intelligently. Don't allow yourself to continue to "muscle" your way through the exercises with poor form. Learn the proper form for each exercise, and learning all of the subsequent exercises will become much simpler.
Subsequent articles will bring more challenging exercises and drills that you can use to not only increase kinesthetic awareness, but also increase dynamic balance and strength.
Basics
Remember ... it's all about basics, my friend, basics. "Rome wasn't built in a day." Our Renegade Coach has a 4-YEAR plan, not a 4-week plan. I, too, want to do the things that he and his athletes can do, yet I know that it takes time. Keep that in mind, get out there every day, do your best and push yourself beyond what you ever thought possible. Do this, and YOU will be living ... The Code.
It is very important that you are 100% comfortable with the tumbling drills introduced to this point. I'd rather you didn't pick up bad habits involving proprioreception by rushing ahead. Perfect your technique, and then move on to these drills.
I will briefly outline the finer points of each exercise. I will also include a few pictures and a video clip to help clarify my points. Let's start with the handstand.
- Take a long, low lunge forward. Keep your hands extended overhead
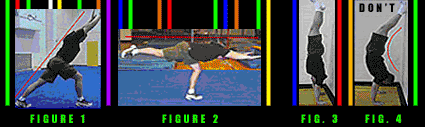
(Figure 1) - As you lean forward, lift your trailing leg up with you, maintaining a straight line from your fingertips to your toes. (Figure 2)
- Push off with your lunge leg, keeping your hands extended overhead.
- All of your weight should now be on your hands. You must "push through" your body with your arms, trying to make yourself tall. (Figure 3) Don't allow your core to arch or sag. (Figure 4)
- Keep your head neutral. Simply reach for the floor with your leg extended and step out of it to complete the skill.
- Safety: if you push off too hard and are heading for the floor, tuck your head, bring your knees to your chest, and lower yourself as slowly as you can with your arms. This will allow you to roll out of it safely on your back
The cartwheel actually starts to get pretty technical. Briefly, here are some tips:
- You go into the cartwheel exactly like you do the handstand.
- At the point of pushing off, one hand hits the ground first.
- Keep the legs split wide during the entire movement.
- Allow your body to rotate 90 degrees and place your second hand down. You are now technically in a split handstand.
- Allow your body to continue to rotate. Your initial "trailing" leg is still in the split position and should be reaching for the floor.
- When your first foot hits, your hips and shoulders should be square and facing the exact opposite direction you started in.
- As you stand up, bring your feet together and lift your hands up with you, extended overhead. If your hips and shoulders are square and in alignment, any momentum still left should force you to take a step perfectly backward, not at an angle. Notice that my feet and hands all follow the line on the track in the movie.
Next
That's it for this week! Next week I'll re-introduce the back extension roll, a move that takes time to master for quite a lot of people. The back extension roll is heavily dependent on complete coordination of and kinetic transfer between the upper and lower body. We'll find out who is up to the challenge, so stick around!
My prayers are with all of you,
Jeremy Nelms, CSCS