
Once you make the commitment to compete you will invest countless hours diligently preparing for your figure competition. As careful as you will be in transforming your body into a lean, sculpted physique, poor stage presentation skills can leave the judges unimpressed—and leave you without placing even after all your hard work.
Adding a carefully planned and practiced posing schedule to your exercise training schedule can be just the thing to make your statement and set you apart from the competition.
A Hard Day's Night
The days and nights of contest prep are filled with sacrifice and devotion to your dream. You train, lift, run, sweat, diet, supplement, and test your deepest determination to carve out a lean, sculpted physique. The chorus of egg whites, oatmeal, chicken, and broccoli play over and over forming a familiar groove in your training album. Your life takes on the same rhythm: Eat, sleep, train. Eat, sleep, train.
As your anticipated contest date approaches you may feel confident about the physical transformation in your body. You have worked hard to make your body the best it could be. You may be ready to present your physique for the judges, but are you ready to pose for those same judges?
Practice Makes Perfect
You've heard the saying before, and for good reason. The more you polish your posing skills, the more you will shine onstage. If you are in a close field of competitors, sometimes just your polished package will make you stand out in the judges' eyes.
Start posing well in advance of your contest, at least two months out, especially if this is your first competition. Start with at least 10-15 minutes every day and gradually increase your posing until you can comfortably hold your poses for at least five minutes each. You could be onstage for 15-20 minutes and you'll want to build up this endurance.
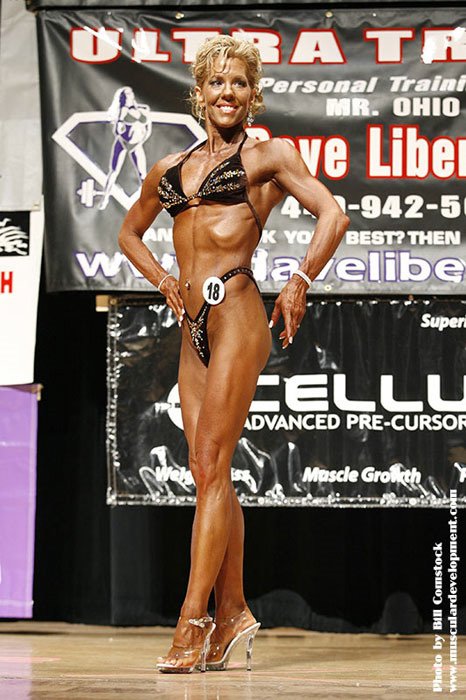
 Click To Enlarge.
 Author Diana Rini, Puts All
Her Posing Practice To Use.
You may even do a mock competition and experiment with your hair style, makeup, jewelry, and the fit of your suit. Try to keep your hair, jewelry, and makeup simple and avoid clunky jewelry, big hairstyles or anything that could distract the judges away from your physique.
Practice your poses in front of a mirror, your family, your friends, and even video yourself to see how you will look to the judges. Try to get fair and unbiased opinions so you know what you can work on and improve. Every time you practice you will feel more comfortable and confident onstage.
Show Time!
On the day of the show wake up early enough (like you were able to sleep!) so you have enough time to do your hair, makeup, pack your bag, and fix any tan mishaps.
Arrive at the contest venue early. Most federations will require athletes to pre-register and hold an athlete meeting the day of the show to brief athletes on items like poses, drug testing, etc. They will give you all the information and times you need. Be professional. Be early and be prepared. Competitors have and will be disqualified for arriving late and it is a shame to see all that hard work go to waste.
Competitions vary from show to show but at show time you will individually enter the stage, perform two or three individual presentation poses and then fall into a single line with the other competitors for judging in a series of poses as a group. These posing guidelines generally apply to NPC standards, but they may be helpful to other organizations as well.
Presentation Poses
Your presentation poses (also called model poses or individual poses) are normally two or three poses that you find most comfortable to perform and which you feel best show your physique. This is your best opportunity to highlight your strengths and downplay your weaknesses.
A common mistake often made by competitors is to rush through their poses. Try to hold each pose for at least three to five seconds, so the judges have enough time to properly assess you. Try counting to yourself or repeat a short saying while you stay in that pose.
Onstage, a second can seem like an eternity so it's common to feel like you are holding your pose long enough, but most likely you will look like you are rushing. You've worked a long time, so be proud to show off those muscles for a few moments!
Look straight ahead, smile confidently and walk to the center of the stage and perform your first presentation pose. Each pose you select should emphasize one or more muscle groups.
Try to start and end with a front pose so you will start and end facing the judges. For example, your first pose can be a front pose, then make a turn to face the back for a back pose, and then make one more turn for a side pose. Finish to the front and give a small curtsy or wave to thank and acknowledge the audience and judges and walk to your place in line.
Don't be concerned where to stand on stage. There are always handlers backstage. These are people who will direct you where to go after you have presented yourself on stage.
Usually there will be a line marked with tape where you will stand and stay in a relaxed, yet flexed, presentation pose. This is your lineup. Here, find which pose works for you, but avoid having your hands clenched in a fist or dropping your smile. Keep facing the head judge, and slightly bend your hips forward to enhance your physique.
Mandatory Quarter Turns
After all the competitors in your class have entered the stage and have presented their individual poses, the competitors will be asked to form a single line facing the judges. Normally, the head judge will take the lead and instruct the competitors to present a series of four poses: a front pose, left side pose, back pose, and right side pose.
Judging will start with the front pose. After this pose, you will be instructed to present the remaining three poses, each time making one-quarter turn to the right until you have made a complete circle. This will allow the judges to evaluate you from each angle. You will finish facing the front in your front pose.
During mandatory quarter turns, judges should assess your overall physique for degree of athleticism, proportion, and skin tone. The judges will be scoring the degree of athleticism by considering firmness, symmetry, proportion and the overall physical appearance. Appearance includes complexion, poise and overall presentation.
Here are some ideas to shine when you present each pose.
1. Front Pose
The first pose is your front pose.
- Stand with your feet together facing the front of the stage.
- Your heels should be touching and your toes slightly apart.
- You may slightly bend your knees and flex your thighs to the outside.
- Flex and hold your abs tight, pulling in your belly button, but don't suck in so tightly that your ribs are showing. Brace like you are about to be hit in the stomach.
- Your arms should be slightly bent at the elbows and slightly away from your body to display your lats, but not so far out that is looks like you are holding two watermelons under your arms!
- Your wrists and fingers should look relaxed, not clenched or like you are shooting a gun. Avoid pointing your index finger!
- Keep your chest and chin lifted high and try to visualize forming long, graceful lines.
- Look confident and smile!
2. Left Side Pose
You will be asked to make a quarter turn to your right. A nice transition is to place your right toe behind your left heel and gracefully turn to present your side pose to the judge. Try to avoid making too many steps, just a one or two step movement should do it (this is where your practicing—or lack of—will show).
- Remember this is a side pose, with your arms at your sides. Sometimes competitors twist their torsos or arms to present their physiques better, but it's best not to test the head judge's patience and call you out to face to the side or drop your arms to the side.
- You can slightly bring your leg that is closest to the stage just slightly in front of the other to make your legs look more flattering and curvier.
- Slightly bring the heel off the floor to make the calves and hamstrings pop out more but be careful you don't lose your balance—you are in 5" heels after all!
- Slightly bend and flex your arm to show your triceps.
- Keep your chest lifted and your lats flared, with a slight curve in the back so your glutes look curvy.
- As in your front pose, keep your head, chest, and chin lifted, with your best dazzling smile!
After the judges have evaluated each competitor, the head judge will call out, "Quarter turn right". Again, place your right foot behind your left heel and make one quarter turn presenting your back to the judges.
If you have long hair, with this movement you will also sweep your hair away from your back so the judges can clearly see and evaluate your back muscles. They are not concerned about your hair and if they cannot see your muscles, they will mark (judge) you down.
There is usually a large field of competitors and judging goes fast. You wouldn't want to miss out on placing because your hair covered your muscles!
3. Back Pose
This pose is probably the most difficult for competitors to do well, so here practice is crucial. Learn to flare your lats to show off your back development.
- As in your front pose, keep your heels together and slightly separate your toes.
- Slightly try to balance your body weight on the balls of your feet and toes to enhance your calves and hamstrings.
- Keep your glutes lifted, which means you will have to arch your back and stick out your butt as far as you can, but still stand upright. Try not to lean forward too much because you will have a somewhat odd appearance to the judges. You want to have your upper back and glutes in a good alignment, not look like you are mooning the audience!
- While your lats are flared push out your back muscles and slightly roll your shoulder forward.
- Your arms are at the sides, again flexed but looking relaxed. Remember, no holding watermelons.
- Flex your legs, but try to avoid overall squeezing your butt cheeks, sometimes this just causes them to look wrinkly.
After their evaluation, you will again hear that head judge say: "Quarter turn right." You should know how to turn, one quarter to the right, to present your right side to the judge.
4. Right Side Pose
This is the same as the left side pose. You may feel that one side is your better side. If so, this is your chance to take advantage of that. You may feel more confident to pop your heel, relax your wrists, or lift your glutes more.
You're almost done so keep flexing, smiling, and thinking about the food your can finally enjoy after the show! You will be asked to again make a quarter turn and face the stage. Go back to your front pose and wait for further instructions.
Sometimes judges will move you around to compare you against another competitor. If this happens, judges will only call you by number, so even though you may be nervous, remember your number! Politely acknowledge that you heard your number by raising your hand and switching with the other competitors whose number also was called.
It's O-V-E-R!
After the judges have finished marking their score sheets, the head judge will usually thank the competitors and tell them they can go backstage. Remember to give a slight wave as an acknowledgement and final gesture of thanks. You will file offstage and you are done! Each class of competitors will go through the same routine until all classes have been judged. After a break, official results will normally be announced in the evening show.
Depending on time constraints, you may present a few presentation poses or be brought out in one line. Your stage handlers will give you exact instructions. Since the judging is over, you will probably feel more relaxed and know that you did your best.
Trophies or awards are presented to the top five finishers in each class. Be gracious and always congratulate the other competitors, even if you didn't place in the top five. You'd want people to be happy for you, right! After all the countless hours invested to make your body the best it could be preparing to be a competitive figure athlete is an enormous investment of time and dedication. That alone makes you a winner even before you step on the stage!
Polish And Shine
Whether you are a seasoned competitor or this is your first competition, looking polished and shining on the stage starts well in advance off the stage. Keep posing practice at the top of your priority list. The confidence your show with polished stage presence just may be what distinguishes you from the competition.
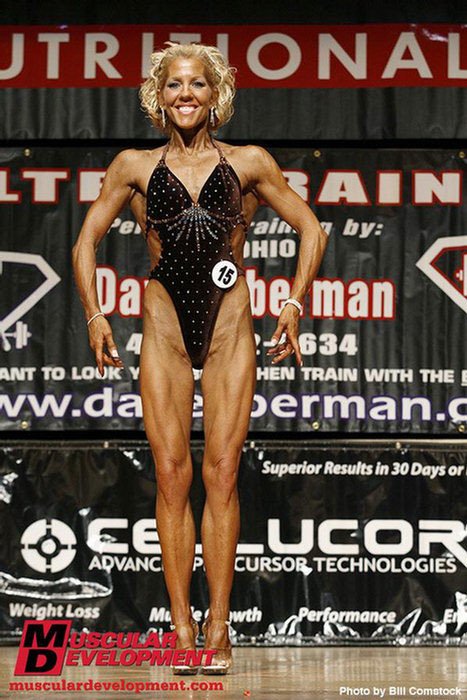 Click To Enlarge.
 Looking Polished And Shining On The Stage
Starts Well In Advance Off The Stage.
That's your personal statement!
About The Author:
Diana Rini is a certified personal trainer, national figure competitor, and owner of Matter of Fitness, LLC, in Willoughby, Ohio. She focuses on educating her clients how to safely and effectively lose weight, get in shape, and improve their lifestyle habits. View her website at www.matteroffitness.com.