The push-up is a foundational bodyweight training exercise, and is a staple in many training programs. Whether you are a bodybuilder looking to get a bigger set of pecs, an athlete striving for improved strength and performance, a calisthenics junkie who swears by bodyweight exercises, or an everyday gym-goer wanting a well-balanced strength training routine - there’s a good chance you’ve used push-ups in your training regimen.
And there’s a good reason: when done correctly, push-ups are incredibly effective for building upper body and core strength. They pack a big punch in terms of muscles utilized, as they target the pecs, triceps, anterior deltoids, and abdominals. Another added benefit is that they can be done anywhere, requiring zero equipment and minimal space.
Unfortunately, many people aren’t getting all the benefits from this beneficial movement because they either don’t utilize the full range of motion and/or don’t execute their push-ups with proper form.

If you always do your push-ups by going halfway down and then back up, you’ll only get stronger in the top half of the movement. Try going all the way down after training exclusively partial reps, and chances are you won’t be able to get back up (at least not with good form).
Why? Because you only build strength in the range of motion through which you work.
Partial reps = partial strength. Full range of motion = greater strength gains.
So, if you’re ready to leave partial reps behind and level up your push-up practice, use this sequence of progressions to help you.
Hardstyle plank hold: in a forearm plank position, contract every muscle group (from the neck down) in order to generate as much full-body tension as possible. Hold it for 10-15 seconds and repeat 2-3 times. This wakes up your muscular and nervous systems and should elevate your heart rate. The ability to generate full-body tension is key to a strong push-up.
High plank hold: the same concept as #1, but in a high plank (push-up position). "Root" yourself into the floor by actively connecting to it with your fingers and toes.
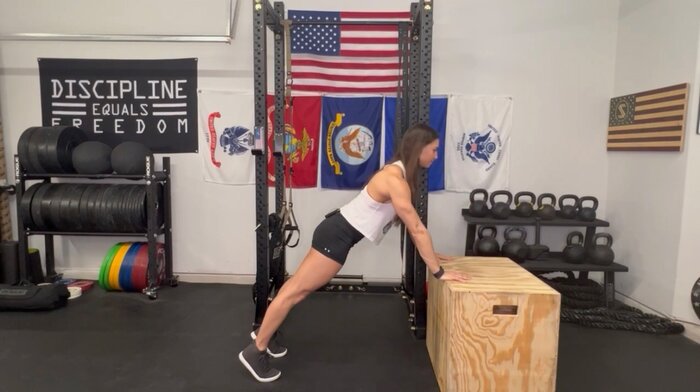
Incline push-ups: use a box, bench, Smith machine, or squat rack to create an incline; then perform full range of motion push-ups with your hands on the incline. Gradually decrease the incline as you get stronger, but be sure you can maintain the plank position and core brace all the way through the movement before progressing.
Eccentric push-ups: begin in a high plank on the floor. Keep your torso in one straight line and think about actively "pulling" yourself toward the floor as slowly as possible.
Knee push-ups: use your own body to create an incline by placing your knees on the floor. Keep your toes connected to the ground as well, and complete self-assisted push-ups like this, focusing on keeping your torso in one straight line all the way through.
Modified concentric (two knees, then one knee): begin in a high plank and lower yourself to the floor while keeping your torso in one straight line. Then drop your knees to the floor for assistance on the way up. Once you can do this successfully with assistance from both knees, progress to using assistance from one knee only (and be sure to alternate sides).
Full push-up: once you've mastered all of the above, you're ready for the full ROM push-up. Utilize the tension principles from step 1 to maintain a strong core brace throughout the entire range of motion.
