
Limber 11: The Only Lower-Body Warm-Up You'll Ever Need!

No more confused wriggling or pointless treadmill plodding. Get warm just like a pro athlete with top trainer Joe DeFranco's 10-minute lower-body pre-workout routine!
For all the incredible, hard-as-nails workouts he's shared with his army of YouTube and blog followers over the years, trainer Joe DeFranco, founder and owner of world-famous DeFranco's Gym at the Onnit Academy in Austin, Texas, never expected one of his most popular routines would be a warm-up.
Isn't the warm-up something most casual gym rats skip so they can get right to the meaty, ego-stroking lifts? DeFranco's online hits don't lie. "A few years ago, I did a blog on what I called the 'Agile 8.' It was a quick eight-move warm-up/mobility routine you could do in 10 minutes or less, anywhere," DeFranco recalls. "The response was huge. It helped tens of thousands of people around the world feel better and even improve lower-back pain. With so much positive feedback, I came back with an upgraded version in a video."
Joe DeFranco's "Limber 11" (flexibility routine)
Watch the video - 19:38
Thus, the Limber 11 was born. A simple, no-frills way to get warmed up for a lower-body workout or athletic activity, the routine combines the very best mobility and flexibility exercises DeFranco has discovered through his years of training the best athletes on the planet, including everyone from NFL players to the stars of WWE.
What do I need to perform the Limber 11?
1
A roller


2
A ball


The Limber 11 Breakdown
1
IT-Band Foam Roll
The "IT" here refers to the iliotibial band, a thick band running from the outer pelvis over the hip and down to just below the knee, where it helps stabilize the knee joint. It tends to get tight, and can become inflamed in anyone who puts a lot of mileage and stress on their legs through running, sports, or lower-body lifting.
This exercise applies pressure up and down the joint via the hard roller, while pausing on particularly painful areas can deliver additional treatment and help break up tight spots and loosen up the tissue.

IT-Band Foam Roll
Start: Lie on your left side with your left hip on the roller. Cross the right leg over so your foot is on the floor in front of your left kneecap, balancing yourself with your left forearm and elbow on the floor. Make a fist with your right hand and place it on the floor as well.
Action: Roll slowly back and forth so the roller goes up and down your outer left thigh. "Take long passes that run from the base of your hip all the way down to the outside of your knee," DeFranco says. "When you find a tender spot, stop there for a moment and add a movement. Flex and extend the knee a few times while the roller is positioned on that spot."
Reps: 10-15 passes per side
2
Adductor Foam Roll
After rolling the outer thigh, you'll hit the inner thigh, where the adductor muscles reside. The adductors are multiple muscles collectively grouped under the title of "the groin," including the adductor brevis, adductor longus, adductor magnus, pectineus, and gracilis. They originate on the bones of the hip and attach on the femur (thigh bone). They also tend to get tight in athletes—hence, the ever-famous groin pull that's sidelined many a pro over the years.

Adductor Foam Roll
Start: This involves a little awkwardness, because it's a hard area to reach with the roller. Place the roller on the floor so that you can lie face down and have it on your left thigh. "I like to place the roller at a 45-degree angle from my torso, since that seems to hit the fibers at the best angle," DeFranco says. Splay your right leg out from your left for balance, with that toe and knee in contact with the floor. Both arms should be on the floor from your palm to your elbow.
Action: Roll the foam slowly up and down your inner thigh from the midpoint of your adductor muscle to just above your knee. Your left elbow will lift up and down from the floor as you do so. As with the IT-band roll, stop at any tender points for a few seconds, flexing and extending the left knee. Make sure you're breathing normally throughout.
Reps: 10-15 passes per side
3
SMR Glute Ball Roll
The gluteus maximus is a key muscle to keep limber because it tends to tighten in athletes, although this "self-myofascial release" (SMR) exercise is also helpful for those with desk jobs who sit on their glutes all day.
"I've positioned this third in the workout because the glutes are a foundational muscle for a lot of other lower-body actions. By opening up these muscles, you'll be able to move a lot more freely," DeFranco says. "Low-back tightness often comes from tight glutes, which pull down on the spine. I've had people tell me they've had anywhere from a 75 percent to 100 percent reduction in low-back tightness after doing this exercise."

SMR Glute Ball Roll
Start: Swap your foam roller for the lacrosse ball, which allows for more targeted pressure on trigger points. Sit on the floor and wedge the ball between your right glute and the floor. Cross your right leg over the left thigh, with your left knee bent and foot planted on the floor. Place both hands on the floor behind you for balance.
Action: Using your hands and planted foot to move, start rolling the ball up, down, and around your right glute. Admittedly, this exercise can be rather uncomfortable, but continue rolling for at least 30 seconds up to two minutes, lingering on any particularly painful spots for a long moment. As the ball presses in, breathe deeply. After you do the back of your glute, straighten the leg out and roll over slightly so you can search for more hotspots along the side of your hip.
Reps: 30 seconds to 2 minutes per side
4
Bent-Knee Iron Cross
After loosening up the gluteal area, this exercise aims higher on the kinetic chain, focusing on lumbar and thoracic spine mobility. Like the SMR ball roll, the bent-knee iron cross can greatly reduce the tension and pressure that exacerbates low-back pain.

Bent-Knee Iron Cross
Start: Lie flat on your back, bending your knees 90 degrees and lifting your feet off the floor, as if you were about to do a knee-up crunch. Place your arms straight out to each side, palms turned so they're on the floor.
Action: Slowly bring your knees all the way down to one side as you turn your head in the opposite direction. Once they touch down, reverse the motion under control and bring them all the way to the other side while you again turn your head. Hold each down position for a two-count. If you'd like, you can carefully pick up the pace throughout the set.
Reps: 5-10 reps per side
5
Roll-over Into V-Sit
This old track-and-field favorite marks the start of more dynamic movement patterns that, along with their mobility benefits, also help elevate heart rate and blood flow. "I really like this one because we're taking a global approach, getting the low back, glutes, hamstrings and groin." DeFranco says.
Roll-over Into V-Sit
Start: Sit on the floor, knees straight and legs out in front of you in a "V" position, with your torso upright and hands at the ready.
Action: Begin by rolling backward. Think about trying to bring your toes to the floor behind you as you go all the way back, your butt and lower back coming off the floor. Once you touch down, reverse the motion, coming back forward to the start position while reaching out as far as you can with both hands as you lean your torso forward. Contact the floor with your palms and hold the stretch for a count, then repeat the sequence. "Think about increasing the pace as you go, trying to reach out a little further forward at the end of each rep," DeFranco adds.
Reps: 10-15 reps
6
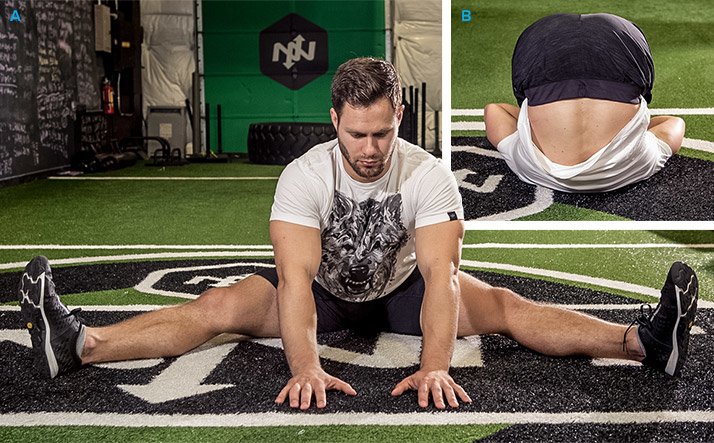
Rocking Frog Stretch
You've surely heard of the "high-groin pull." Grade-school snickers aside, it's a painful injury that can sideline any athlete for weeks. Not only that, once pulled, "it's a pain in the ass to heal," as DeFranco puts it. The frog stretch is designed to improve the strength and mobility of that tender area. It can also be a game-changer for your squat depth.

Rocking Frog Stretch
Start: Get on your hands and knees. Now, spread your legs out about 3-6 inches wider than your shoulders and turn your toes so they're pointed outward. Your big toe should remain in contact with the floor, as should the inside of your knee. At this point, you should already feel a bit of a stretch in your groin. Bend your elbows and drop down so you're resting your torso on your forearms.
Action: Rock backward under control, pushing your hips straight back as your forearms stay on the floor. Once you're back as far as you can go, hold for a two count, then release by coming back forward. Each rep, try to push a little further. After your main reps, you can shift side to side for additional stretching.
Reps: 10 reps
7
Fire-Hydrant Hip Circle
"Unfortunately, I'd say 99 percent of the people I see doing the fire-hydrant stretch perform it wrong," DeFranco says. That's a shame, because this hip-mobility drill is extremely effective and relatively straightforward. Here's how to nail it.
Fire-Hydrant Hip Circle
Start: Get on your hands and knees with elbows straight, hands on the floor directly below your shoulders and knees just inside shoulder-width apart. Lift one knee off the floor and up to the side, keeping your knee bent so that your foot is near that same-side glute.
Action: Make sure all movement is taking place at the hip joint, as if you're drawing a nice tight circle with your kneecap in the air. After 5 forward reps, reverse and do 5 backward reps, all the while keeping that foot close to your butt.
"One mistake people make is they bend their elbows, leaning forward and making it look as if they're stretching their hip higher, but it doesn't do jack for improving mobility," DeFranco says. "Instead, keep those elbows straight and core tight, and focus on those circles coming directly from the hip."
Reps: 10 circles per leg in each direction, forward and back
8
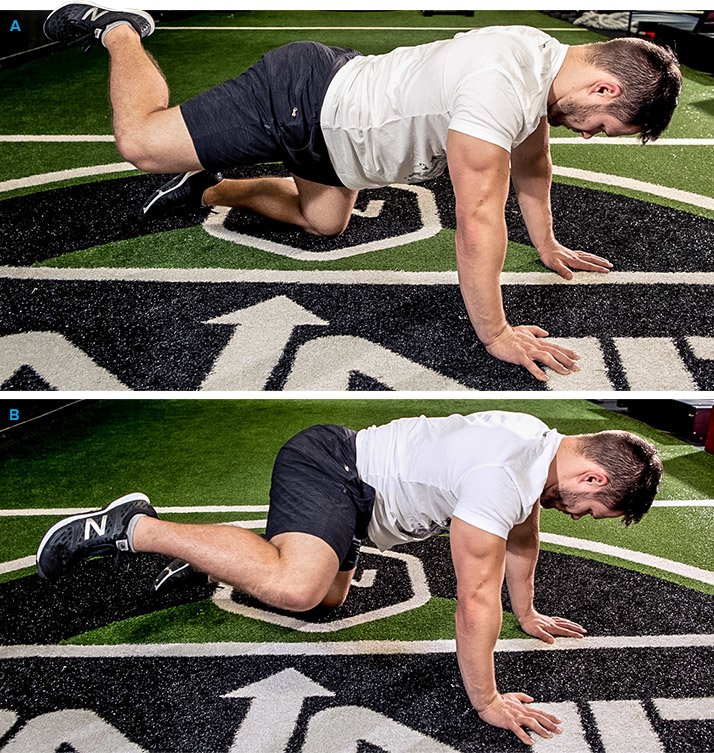
Mountain Climber
This boot-camp-style favorite isn't just good for breaking recruits down into a weeping pile of flesh and sweat. It'll also help open up the hips, hamstrings, and groin while ramping up the cardiovascular system.

Mountain Climber
Start: Begin in a narrow push-up position, which is similar to a plank except you'll be on your hands instead of your forearms. Your body should be straight and tight from your head to your heels.
Action: In a continuous fashion, pull one knee forward toward your chest while the other leg goes backward, as if you're running in place with your hands always in contact with the floor. "You can also bring your knees outside your elbows on each rep to stretch the groin more dynamically," DeFranco says.
Reps: 10 per leg
9
Cossack Squat
Another stretch aimed straight at the groin, the Cossack squat will do wonders for the long adductors inside the thigh. Both legs get worked in their own special way, so pay special attention to your form.

Cossack Squat
Start: Assume a wide stance with your toes pointed out about 45 degrees, or essentially a sumo-squat position. Now lower your hips to get into a deep stretch position and bend your elbows, which should be hovering right around knee level.
Action: Deliberately slide your hips from one side to another as far as you can go while keeping the same-side heel down to the floor, your torso more or less upright, and chest proud. Your outstretched, trailing leg will go straight with the heel down and toes pointed up.
"As I come across, I like to push my elbow into the side of that bent knee for an extra stretch on the inner thigh," DeFranco explains. "If you have any trouble keeping your heel down as you slide your hips toward that leg, you can place a box or platform in front of you and put your hands on it as you do the exercise."
Reps: 5-10 reps per side
10
Seated Piriformis Stretch
"Piriformis" literally means "pear-shaped" in Latin, and here refers to a muscle located behind the gluteus maximus. Irritation of this muscle can affect the sciatic nerve, causing pain and tingling down through the leg into the foot, so it pays to keep it limber.

Seated Piriformis Stretch
Start: Sit down on a bench or chair and cross one leg so that ankle is on the opposite thigh.
Action: Just lean forward! "For a lot of exercises, I like to cue our athletes to keep a neutral spine, but for this one I really don't have a problem with rounding the low back to lean forward a little further," DeFranco says.
You might also put your hand or elbow on the elevated knee and apply some pressure for an additional stretch, or grasp the shin of the leg planted on the floor to pull yourself down a few extra clicks. "I like to finish this stretch by grabbing the knee with both hands and pulling it up toward my chest. At this point, you want a neutral spine, sitting upright, with a solid core," DeFranco adds.
Reps: 20-30 seconds per side
11
Rear-Foot-Elevated Hip-Flexor Stretch
The Limber 11 ends with a deep leg stretch that hits the hip flexors, glutes, and thighs as a whole, including the quadriceps. It's perfect if you're about to engage in some heavy-duty squats or any sporting event that involves stop-start sprinting.

Rear-Foot-Elevated Hip-Flexor Stretch
Start: Stand facing away from a flat bench or chair, and elevate your right leg behind you. Lower yourself so your right knee is bent and touching the floor, while your left leg is in a lunge position, foot flat on the floor, and knee at a 90-degree angle.
Action: Lean forward and place your right hand on the floor alongside your left foot, then contract your right glute for 2-3 seconds. Next, return your torso to an upright (not hyperextended) position, contracting that right glute to assist in the motion, and bring both arms straight overhead, holding that position for 2-3 seconds. Tilt slightly in the opposite direction of the right leg while your arms are overhead.
Reps: 6-10 per side