
Back in 2008 during the Summer Olympic Games, people who tuned in to the beach volleyball competition noticed something a little strange. What was that funny-looking colored tape that some of the athletes were wearing?
Sports care providers and elite athletes could have told you that what you were looking at was called kinesiology tape. They had been using it for decades, but almost no one else had. In the last few years, though, taping has definitely come down the mountain. Today, it's an increasingly common sight not only in team sports, but also in more general weight training, running, and cycling.
You can buy high-quality tape in almost any sporting goods store or online, and you don't need to have a pro help you apply it. Sons can effectively tape up their dad's golfer's elbow before a weekend tourney.
Friends tape each other's lower legs to help with shin splints or calf pain prior to running a 5k. CrossFit athletes apply the tape on their abs and lower backs during training and competition—but so do pregnant women during the third trimester.
Great—but does it work? In my experience as a chiropractor who deals with plenty of athletes, it definitely does. The tape helps speed up the healing process while supporting injured tissues.
It also allows athletes to train with minor muscle injuries while the healing process continues.
If that sounds like what you need to stay off the sidelines, here's what you should know.
WHAT DOES KINESIOLOGY TAPE DO?
Kinesiology tape is designed to mimic human skin. When placed on a body part, it helps facilitate the body's natural healing process by lifting the skin away from the muscle fascia, creating space between the blood, lymph, and nerves.
This improves circulation and reduces pressure on sensory and neural receptors, which reduces pain. This method of taping allows more movement than traditional athletic taping for injuries, which is more compressive and limits joint movement.
Depending on who you ask, the benefits of kinesiology tape differ slightly. But overall, these are the main benefits people experience:
Muscle and joint support to encourage correct movement and limit compensation due to injury.
Pain relief through improved blood circulation and lymph drainage.
Increased sensory stimulation through the skin, which can alleviate muscle weakness and reduce muscle pain.
The most common injuries that can benefit from taping are wear-and-tear phenomena like strains, overuse injuries, and ligament pain. For more advanced injuries, start by meeting with a qualified health care provider and building a treatment program that is based on a personal examination and history.
Once the injury has improved and proper instruction on taping has been given, you can try home taping.
KNOW YOUR STRIPS
A little bit of education goes a long way when it comes to kinesiology taping. Don't just slap a strip on and expect it to work for you. Specific applications and technique will differ according to what area you're treating and your desired goal.
Start out by getting proficient with your tape provider's preferred technique. Once you've mastered the basics, you can experiment with some of the more complex arrangements you see on CrossFitters and other athletes.
No matter the technique, though, it always starts with you making the base or anchor of the tape. This is achieved by tearing the backing so approximately two inches of tape is exposed. Place the two-inch portion down on the skin and rub the non-sticky side to help activate the adhesive.
Don't place any stretch or tension on the base. From there, remove the rest of the backing and maneuver the rest of the tape into one of these four basic styles of application.
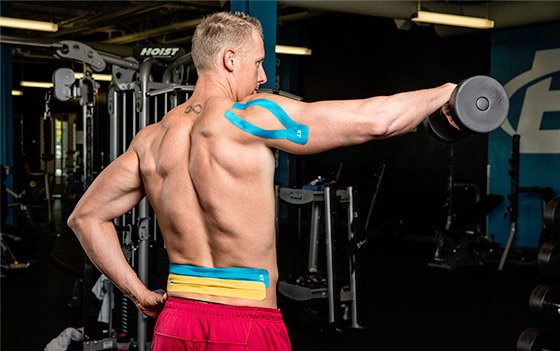
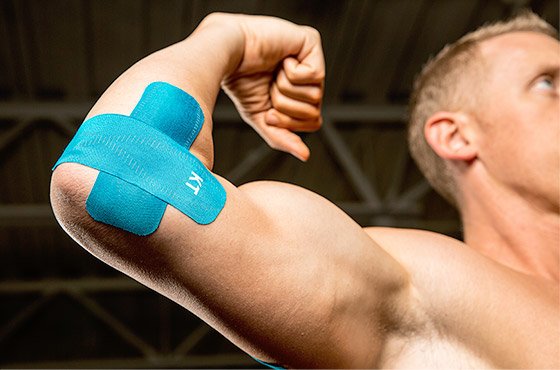
I-Strip
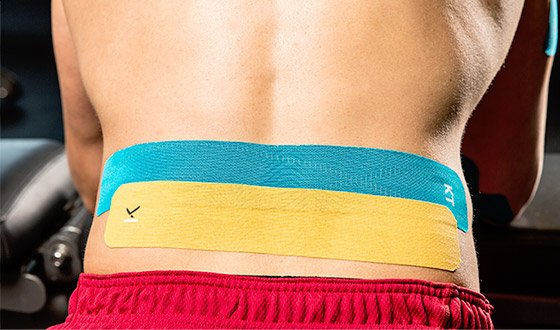
I-strip
Using an I-strip is a good application for muscle injuries. Simply apply the strip directly over the muscle belly with minimal stretch. I also like to place a smaller strip perpendicular to the first strip lying directly over the injured area for additional support.
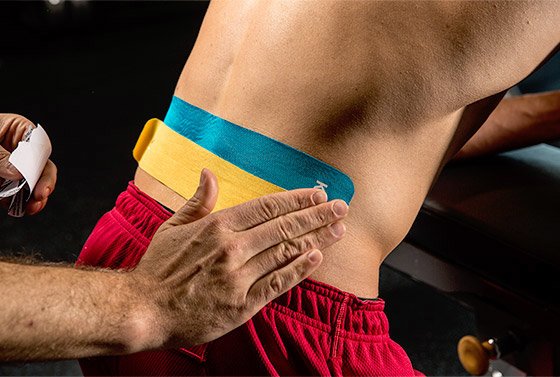
Y-Strip
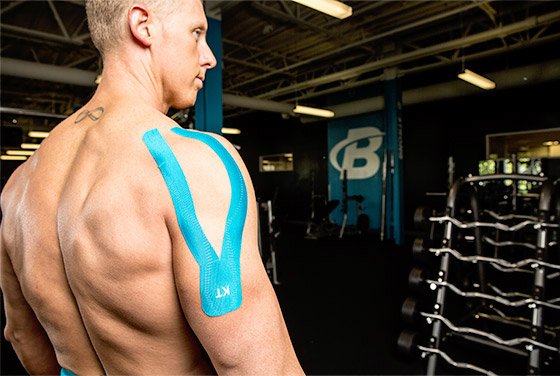
Y-strip
A Y-strip surrounds a muscle by using its two tails for support. It is commonly used on the calf, triceps, and shoulders, among other applications. Some tape companies sell pre-cut Y-strips, but you can easily make one by cutting down the middle of an I-strip.
Once the base is laid down with no tension, apply the tails to or alongside a muscle. The tension on the tails should be equal. I use this applications a lot for neck and shoulder problems.
X-Strip
X-strip
You can make an X-strip either by overlapping two strips or cutting a single strip. I like to use this application at the elbow, knee, and other delicate areas where having multiple points of support is helpful. When working around joints, try to keep equal tension on the tails.
Fan Strip
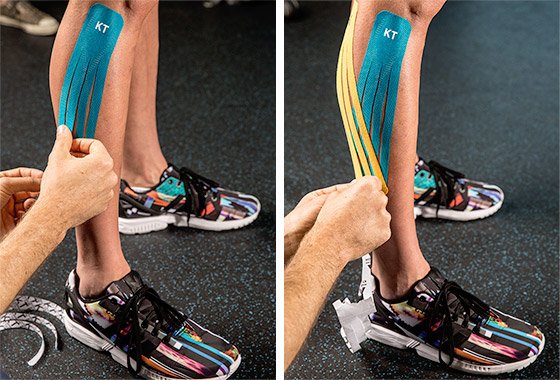
Fan strip
This application is used primarily for reducing edema, or swelling. It consists of a base with 4-5 thin strips. Depending on the body part, the strips are usually placed about a half-inch to an inch apart.
A second strip can be place on the opposite side of the first base, and the strips can be placed in an overlapping fashion. This further helps with edema reduction. Athletes use fan strips all over the body, but some common applications include sprained ankles, plantar fasciitis, and on the abs or shoulders.
These are just the start. If you watch the numerous instructional videos put out by tape manufacturers, you'll see all of these styles mixed in complex tape patterns. Mastering them will take practice, and often, a patient partner to learn with you. If you fear that you're not up to the task, seek out an experienced sports therapist or chiropractor in your area.
8 RULES FOR EFFECTIVE KINESIOLOGY TAPING
1
Buy the right tape for you
Tape can be purchased in two-inch rolls similar to standard athletic tape, and sometimes a four-inch strip for larger areas like the low back.
If you're a trainer or coach who will use a lot of tape, you could invest in a range of tape precut into X, Y, and fan formations.
The rest of us can simply cut I-strips into the shape we need. Each supplier has different varieties of tape to choose from.
2
Prep your skin
I say this because I have sometimes not prepped the skin properly, and the tape didn't adhere firmly or came off too soon. Make sure the area of the skin to be treated is dry and free of oils, creams, and lotions.
Also make sure that there is not excessive body hair. Applying tape to a hairy area will interfere with the adhesion. Get a trimmer and shave the area if necessary.
3
Tape stretch and tension are crucial
Most applications require a certain amount of tension be placed on the tape—typically 0, 25, 50, or 100 percent. An easy way to understand this concept is to start by stretching the tape to maximum length—that's 100 percent. If you back it down halfway, that's 50 percent, and another half-step down is 25 percent.
Placing the tape on the body without stretch would be called no stretch or "paper-off" tension. Tension can also be achieved by stretching the body part, then taping it in the stretched position.
All of these techniques have their uses, and sometimes a guide will have you mix them in a single application.
4
Rub to make it stick
You're not done once the tape is on the skin. You also need to gently rub the tape along its surface a few times. This will help activate the adhesive to the skin.
5
Keep it dry at first
Every kinesiology tape I have ever used was water-resistant. That means the tape should stay on while bathing or swimming. However, with so many brands flooding the market, there might be one or two that aren't as resilient as the top brands.
Just check the labels and there should be no problem. I recommend that my patients keep the tape dry for at least 30-45 minutes after application to let the adhesive set.
6
Don't put heat on the tape
Whether it's a heating pad, hot pack, or dryer, keep it off of your kinesiology tape. Heat will increase the adhesion of the tape and make it hard to remove. I once had a patient have her low-back tape become melted on simply due to a heated car seat.
On the other hand, applying ice is fine, and I recommend icing for injuries accompanied by acute swelling.
7
Don't rush to reapply
Kinesiology tape isn't like a bandage that needs to be replaced daily. In general, a taping application should last 3-5 days. Some higher-end tapes can last for weeks, but I've also seen them come off in a couple of days from poor application. It depends on skin prep, activity levels, and patient care.
8
Be gentle with tape removal
Don't just rip it off, which can cause skin irritation. Pick one corner or end free with one hand, and then press your free hand on the tape. Slide the pressure down the tape as you pull behind it. You can also make tape come off more easily by removing it in the shower or applying baby oil.
REFERENCES
- Stanton, T. (2012, November 1). Athletes Believe in It—Should You? Retrieved from http://www.aaos.org/news/aaosnow/nov12/cover1.asp
- Kinesiology Taping. (n.d.). Retrieved from http://www.acatoday.org/content_css.cfm?CID=5288
- Kase, K., Wallis, J., & Kase, T. (2003). Clinical therapeutic applications of the Kinesio taping method (2nd ed., pp. 12-41). Kinesio Taping Assoc.
- Capobianco, S., & Dries, G. (2009). Powertaping, taping movement, not muscles (3rd ed., pp. 12-14).
Recommended For You
How To Stretch Properly: The Do's And Don'ts Of Stretching
Maintaining flexible joints will help any lifter improve his or her health and fitness. Learn how to stretch your gains with this complete guide to stretching!
Arachidonic Acid: When Inflammation Is Good
Your body knows how to use training-induced inflammation as a springboard into muscular gains. Now there's a supplement that taps into this process.