Like others animals, I've been around the block a couple of times. I've been training and competing for 25 years and I've squatted over 1000 lb. No I'm not trying to brag, but my point is, if you do the squat right, you too could put up a lot of weight. I don't know how many times I've seen guys do the squat incorrectly.
All too often, lifters struggle with the lightest of weight because of improper form. Bad form must be avoided at all costs because a majority of injuries that occur due to the squat wouldn't happen if proper form was used when heavier weights are attempted.
When it comes to doing the squat, you've got to get everything right. There are many variables that come into play when you're trying to increase your one-rep max in the squat. What I mean is that you have to examine the entire lift from start to finish. For some lifters, the squat may come natural and with very little training.
These lifters are able to make some very impressive gains quickly. For others, the squat may feel so uncomfortable that they quit before giving themselves a chance to excel. Let's begin by looking at the motion of the squat.
Factors That Effect Making Gains
Movement
The biggest and most common mistake occurs when a lifter starts the movement. Usually, I see a lot of guys begin by bending their knees. The first bending motion should be in the hips. You should dip your hips back, like your going to sit into a chair, trying to keep your shins as upright as possible.
If you watch someone from the side do a squat correctly, the motion of the bar goes almost straight down and straight up. This method keeps the bar over the central most part of your body, enabling you to use your entire body and not just your legs. Believe me, this makes a world of difference.
Bar Placement
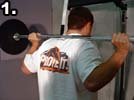
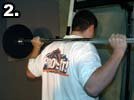
Bar placement could be a major factor in the weights you handle depending on the style of squat you're doing. If the bar is placed to high on the traps (1), it could cause you to bend too much at the waist. This will throw your hips up at the bottom of the squat, dumping a heavier weight over your head. Placing the bar too low on your back would cause a similar problem.
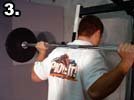
In this case, the bar could roll down your back, placing a great deal of stress on your rotator cuffs (2). The ideal placement of the bar would be between the lower traps and upper rear delts (3). Over time, you will create a comfort zone we powerlifters call the "shelf". You may have to hold your elbows up during the squat to create this shelf.
Grip
Another factor dealing with bar placement is your grip on the bar. You want to stay as tight as you possibly can during the squat, so it helps to squeeze the bar in order to maintain a firm grip. This will also help to keep the bar from rolling up and down during the lift. If your wrist or shoulders start to hurt while squatting, you may want to widen your hand placement. Just remember, the wider your hands, the greater the chance that the bar will roll on you.
Foot Placement
Foot placement is probably the biggest issue when it comes to squatting. Again, it all depends on the individual lifter. A good rule of thumb to remember is that a lifter with larger hips will tend to squat better with a wider stance and a lifter with larger quads will tend to squat better with a closer stance. When squatting, I personally like to look down at the ground until I'm set with the weight on my back. This way you can actually see your stance, instead of just feeling it.
Walkout
Up until a few years ago, the walkout played a big part in the squat. But due to safety reasons, the mono-lift style squat rack was developed. In this style of rack, you have your feet already in place, knees bent, and back straight. As you straighten your legs to stand erect, your spotter lifts a lever that moves the rack out from under you. Now all of your strength can be used to squat. If you do not have access to a mono-lift style squat rack, you can use this same form in a power rack. Just have your spotters pull the safety pins as you stand up with the weight.
Breathing
Believe it or not, the way you breathe can play a factor in your squat or for that matter any lift where you strain. You never want to exhale during the decent of a lift, especially the squat. Take a deep breath and hold it as you squat. Some lifters yell, scream or exhale as they come up from the bottom. Me, I personally hold my breath all the way through the lift.
Gear
Gear can play another big factor in the squat and I could write an entire article on just the different types. In brief, one-piece squat suits today are made from polyester, denim and canvas. They range from one layer to three layers, some with solid straps and others with Velcro. Squat briefs are worn underneath the squat suit to add more support.
There is a wide variety of wrist wraps, knee wraps and belts being used also. Some lifters prefer boots, while others prefer tennis shoes. Some prefer a heel, while others prefer a flat-soled shoe. Support gear and the types can be a heated topic at times with some lifters. As a whole, the gear was developed so that lifters could move a heavier weight more safely than they could raw.
Routine
I could talk at length about the squat. I preach constantly about how our bodies adapt to repetitive exercises. For this reason, I believe in constantly changing the workouts. In the off-season, I do something different in almost every workout and usually perform higher than normal reps. I usually try to limit the exercises to no more than five, sometimes only one, depending on the amount of reps I do. With twenty-five years of training and competing under my belt, I've used a wide variety of workouts. To increase my one rep max in the squat, I've used multiple explosive singles. The following is an example of this type of workout.
The Example Routine
Week 1:
- For the first week: 135 lb. x 10, 225 lb. x 5, 315 lb. x 3, 405 lb. x 1, 500 lb. x 1. Rest for 30 seconds and then repeat this set for 5 singles.
Weeks 2-5:
- Increase my top set of singles by 10 lb. each week.
Week 6:
- The warm-ups would stay the same up to 500 lb. My top set would start with 3 x 3, using knee wraps and a belt @ 550 lb.
Week 7:
- The same as week 6 except my top weight would be 560 lb.
Week 8:
- Top weight would be 570 lb. for 2 x 3.
Week 9:
- Using a squat suit, knee wraps, and belt, I would start three singles again with 580 lb., with only 3 minutes rest between sets.
Week 10:
- Same warm-ups, then three singles with 590 lb.
Week 11:
- Same warm-ups, then three singles with 600 lb.
Week 12:
- Meet or peak day: 600 lb. x 1, 620 lb. x 1, 640 lb. x 1. Remember to stay tight, take a deep breath, dip your hips back, keep your shins as upright as possible, push your knees out and squat on the outside of your feet.
Most importantly, EXPLODE out of the bottom. Good luck and train smart. Remember to use a belt.


