Though I spent many years entrenched in mainstream gym culture at the start of my fitness career, for the last several years I've primarily isolated myself to the bodyweight/calisthenics community. Since I made this change, most of my training takes place outdoors at my local park or inside independently owned training facilities. A lot of my workouts require nothing more than the floor. The most complicated pieces of equipment I use are a pull-up bar and maybe a jump rope, suspension trainer, or resistance band.
Contrary to what you might think, the more I've stripped down my workouts, the stronger and leaner I've become. In fact, one of the most demanding and rewarding exercises in my program is a move that requires no equipment at all. I'm referring to the one-arm push-up. Though the average gym-goer tends to associate calisthenics with fundamentals like jumping jacks and running in place, this movement is proof that you can get crazy strong using nothing but your own body weight for resistance.
I sometimes forget that to most people—even many strong people—an exercise like a one-arm push-up is pretty out there. It can be hard to know how to even begin to approach such a move. If you're not sure where to start, here are some techniques you can use to gradually work your way to a full one-arm push-up—and beyond!
Foot Position
The question of foot width almost always comes up when someone is learning the one-arm push-up, so I'll address it at the start. Your foot placement is a variable that can definitely affect the difficulty of the one-arm push-up. While placing your feet in a wide stance is optimal for one-arm push-up practice, the wider you go, the easier the move becomes. So feel free to start wide, but aim to get narrower over time.
Though some folks will argue that the feet should be together in a true one-arm push-up, I contend that the ideal form for a one-arm push-up is with the feet a bit wider than shoulder width. The inevitable hip torque that happens when the feet are placed alongside each other is less favorable to me than any perceived negative aspect of a wider foot position.
Close-grip Push-up
It's a given that you need to be able to perform lots of standard two-arm push-ups before you even consider training for a one-armer, but what many people overlook is that bringing your hands closer together on two-arm push-ups can be a helpful intermediate step.
Remember to keep your elbows tight against your sides with the tips of your index fingers touching when performing close-grip push-ups. When you can do 20-30 of these consecutively with perfect form, you're ready to move on.
The close grip variant is also good preparation for a one-arm push-up because of the similar hand position. To perform a proper one-armer, you'll need to have your pushing hand directly beneath your torso, just like you do in close-grip push-ups.
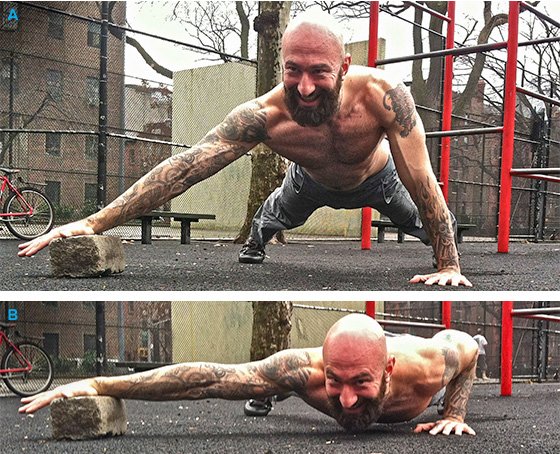
Elevated One-Arm Push-up
Another helpful technique to employ on your road to the one-arm push-up is a modified version with your pushing arm on an elevated surface like a bench or bar. Just like standard push-ups, keeping your hand higher than your feet will give you a mechanical advantage, thereby reducing the amount of strength required to perform the exercise.

Remember to think about squeezing your whole body, especially your abs and glutes, in order to create full-body tension when practicing toward one-arm push-ups. This is particularly helpful during the transition as you begin to press yourself back up from the bottom.
As with a full one-arm push-up, your other arm can be placed behind your back or held against your leg.
Self-Assisted One-Arm Push-up
Another helpful technique is to use your secondary arm to assist your pushing arm by reaching it out to the side and/or placing it on a slightly elevated surface. The idea is to rely as little as possible on the assisting arm and do as much of the work as possible with your primary arm. Over time, you will rely on it less and less until you eventually don't need it at all.
Self-Assisted One-Arm Push-up
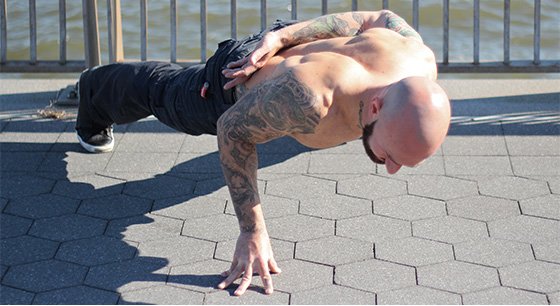
Negative One-Arm Push-up
Once you are on the brink of full one-arm push-ups, it's beneficial to practice the lowering phase to help establish the movement pattern in your brain. To take full advantage of this technique, lower as slowly as possible and stay in control of your movement.
When you get to the bottom, just put your other hand on the floor and push yourself back to the top with both arms. I prefer to alternate sides when practicing negatives rather than perform a set with each arm.
This helps make sure that I practice this isolateral exercise evenly on both sides to avoid exacerbating any muscle imbalances.
Push Yourself
Depending on where you are starting out, learning to do a one-arm push-up can take anywhere from a few weeks to a few years, so be patient. Even once you get strong enough to perform full one-arm push-ups, however, there are still many way to progress this exercise. You can try them on your knuckles, fingertips or even the back of your hand. There are endless ways to keep your calisthenics routine interesting and challenging.