
For both beginners and seasoned veterans, pulling more weight seems to be the ultimate goal. Unfortunately, it often comes at the expense of proper form. Look around in the gym, and you'll notice this with the deadlift as much as any other movement. It's easy enough to spot the person deadlifting wrong; just look for that guy with the dangerously rounded back that could snap clean in half at any minute. It hurts to watch.
It would be easy to tell him he's pulling too much weight, but that's almost never the whole problem. No, the real issue is that his hip hinge isn't solid enough to handle the weight he chose! The hip hinge is the fundamental movement pattern for the deadlift, as well as the kettlebell swing, Romanian deadlift, good morning, and explosive barbell movements like cleans and snatches.
If you're not performing the hip hinge correctly, you're not performing these movements correctly—and that means you're at risk for serious injury. Let me say this another way and make it absolutely clear:
You shouldn't do deadlifts, or cable pull-throughs, or good mornings, or even pick up heavy everyday objects, until you master the hip hinge.

Yeah, it's that important. I have tweaked my back a handful of times when I was being careless and didn't pay attention. But it's not an easy movement to master, and it's not one that many of us have the opportunity to learn or practice outside of the gym. So let's break it down to the basics.
Keep your chest up. Tuck that chin. Pull your shoulders back and down. Push the knees out when you pull. Squeeze the glutes at the top. Don't hyperextend. Look down. Sit back, sit back, sit back.
These are some of the more common coaching cues used when walking someone through a deadlift, whether trap bar, sumo, or conventional. Unfortunately, for most people it's not as simple as hearing the instructions and being able to following them, particularly with inexperienced gym-goers or teens going through their awkward gangly-limbs phase. Getting set up properly for a hip hinge is about as easy as tying a cherry stem into a knot with your tongue.
When I was interning at Cressey Performance, I was taking a high school baseball athlete through his first training session. Let's call him Bob. He was 17 years old, and he was uncoordinated. But he told me that he had lifted weights before, so I took that to mean he had experience with basic movement patterns. I had him stand inside the trap bar and instructed him to get into his starting position. He hunched over and grabbed the bars, his back as round as could be. Yikes.
I cued him to get his chest up, and he cranked his head up to look at the ceiling, severely hyperextending his cervical spine. "Like this?" Uh, not quite. I told him to flatten his back, and he bent his knees more. I took this as a glaring sign that the kid needed a little more practice with each individual cue. Still, I poked and prodded him until he eventually reached a proper setup.
From there, with 10-pound bumper plates on each side of the bar, I had him pull. Then I told him to reverse that exact same movement on the way back down, and again he hunched his back as he brought the weight to the floor. No bueno.
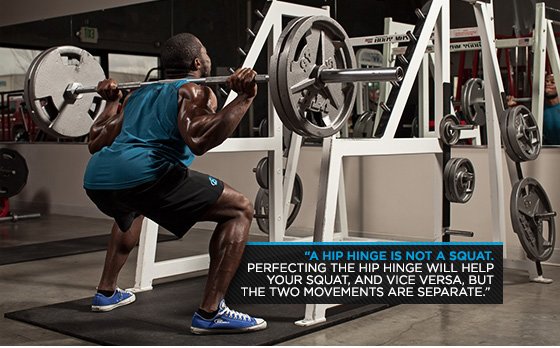
What did Bob do? It was supposed to be a deadlift, but it ended up looking like a hunched, bent-over kind of a squat, really. And it's common, probably because Bob was always told to "lift with your legs, not your back" while growing up. But let's be clear: A hip hinge is not a squat. Perfecting the hip hinge will help your squat, and vice versa, but the two movements are separate.
The hip hinge is, in general, any flexion or extension originating at the hips that involves a posterior weight shift. With the hip hinge, you maintain a neutral spine and bend at the hips, not the low back. This pattern relieves stress off of the lumbar spine and can prevent a whole host of injuries. Just watch any toddler bend down to pick up an object and you will observe a perfect hip hinge. It's a shame we unlearn this movement pattern as we become adults.
There are a number of ways to go about learning this movement. The first option for most trainers is external cues. For example, "Imagine I've got a string tied to your tailbone. Now, if I pull that string back, what will happen? You'll break at the hips first, not the knees, as you sit your butt back."
This isn't a bad cue, but it's hard for some people to visualize. To make it more concrete, walk over to a wall. While you stand about three inches away from the wall, facing away, try to tap the wall with your butt. To do this, you have to stick your butt out and hinge at the hips. Once you've done this from three inches, step away from the wall another inch and repeat the same movement. Finally, step another inch forward and execute a full hip hinge.
You'll feel a nice stretch in your hamstrings and your knees should only have a soft bend in them. Voila! Hip hinge complete. But our lesson isn't.
While I like the wall drill, it doesn't always work. Sometimes you think that you're going to tap the wall with your butt, but instead, you lean back with your whole body, thumping the wall with your entire back.
Luckily, there's another way to practice that gives more concrete prioperceptive feedback, one that guarantees you get to experience the tactile feel of a proper hip hinge. To perform this exercise, place a dowel along your back so there are three points of contact: the back of your head, the upper back, and the sacrum. From there, with your feet shoulder width apart and toes pointed slightly outward, sit back with the hips, all the while maintaining contact at the three points.
If you ever lose contact, you're doing the movement incorrectly and you should start over. The movement should look like this:
Dowel Hip Hinge Video
Watch The Video - 00:13
To start out with, perform 3 sets of 10 reps. Do it at home, at the gym between sets, or after a workout—whenever you can squeeze it in. It won't be long until you pick up the movement pattern, because the feedback is direct and unmistakable:
- If it's not touching your tailbone, your spine is flexed, not neutral.
- If it's not touching your upper back, you're squatting too much, or your head is tilted too far back.
- If it's not touching your head, your spine is flexed or your head is tilted too far forward.
Once you've got the dowel drill down—and I mean down—you can transition to a cable pull-through or trap-bar deadlift. By then, those deadlift cues from above will be far more approachable. But just because I'm nice, here's one more tip that I've seen work over and over again.
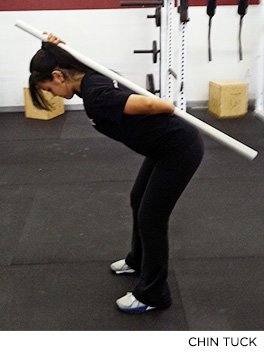
Keep the chin tucked, even at the bottom.
Many people have a habit of looking straight ahead as they deadlift. As they lower the bar, then, their neck cranks all the way up. The chin should be tucked throughout the entire range of motion, even at the bottom.
One way to combat this is the ball-under-the-chin method, in which a lacrosse ball, tennis ball, or baseball is placed under my chin. However, this can be distracting.
Instead, I advise you try biting the collar of your T-shirt. This serves as a constant passive reminder to keep your chin down, so it takes the thinking out of the equation. To help stay in this form, look at a single spot on the ground 4-5 feet in front of you at all times.
Learning The Hip Hinge—Chin Tuck Trick
Watch The Video - 00:23
Take the time to master the hip hinge, as it will spare your back over the long run and prevent needless trips to the doctor. You owe it to yourself to take care of your back for optimal health and performance in the gym.