
I'm fortunate to work with some of the strongest people in the world, so I get a daily inside perspective on what they do to get—and stay—at the pinnacle. Some of what they do applies strictly to elite athletes and wouldn't make sense in your workout. I'm thinking of the immense volume, huge weights, and peaking phases that can cause your life to come to a screeching halt.
But the strongest people in the world also share plenty of similarities with the rest of us. Their big lifts stall out in the same places—even if it's with way more weight—and when it happens, I have them solve the problem with techniques and exercises that are definitely worth your time as well.
Let's take a look at my top five movements that are currently in their programs, but probably not in yours.
1. Dead Bench Press
The bench press has an ascending strength curve, meaning it's hardest at the bottom of the movement and gets easier as you extend your arms toward lockout. In a powerlifting meet, this is amplified, because lifters are required to momentarily pause the barbell on their chest and wait for the referee's single to begin the press.
The dead bench press, also known as the dead-stop bench press, takes dead aim at the toughest part of the lift, because the energy created when you reverse direction is eliminated! You're forced to push the weight from a dead stop off of the pins. Contrast that with the elastic-like assistance that's built up on the negative rep when you reverse direction after lowering. Yes, it's harder, but it's the best way to build tremendous power out of the position where you're weakest. Moreover, this movement builds starting strength and rate of force development (RFD), qualities that transfer to the field of play in more traditional sports.
Here's bench-press world-record-holder Jeremy Hoornstra demonstrating the dead bench press.
Training Tips: Short-armed lifters should start the weight about half an inch off the chest in the power rack, and long-armed lifters should start approximately an inch and a half off the chest, pushing the weight up as explosively as possible. My preference is to use this technique only with single reps in a power rack, starting not from an arms-extended position but with the bar just off your chest.
If you're doing multiple reps, allow the bar to momentarily settle on each rep, to eliminate the stretch reflex each time. Make sure the safeties are positioned according to the recommendations above.
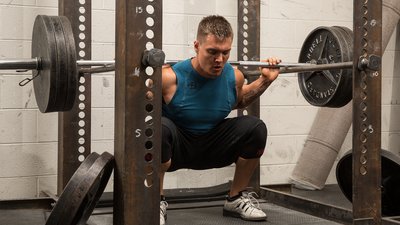
2. Dead Squat
Even though the squat has an ascending strength curve, meaning you're weakest in the bottom position, many lifters are able to come up a couple inches out of the hole before getting stuck. Why's that? Because the elastic-like energy stored on the negative portion of the lift, i.e., the stretch reflex, drives them out of the hole.
With dead squats, also known as dead-stop or Anderson squats, you have to get the weight moving all by yourself as, again, you're eliminating the stretch reflex. This develops greater starting strength and activates more motor units. Basically, you're building strength in a position that will help eliminate the limiting factor.
Dead squats also offer transference to all forms of the deadlift, but particularly the sumo variation and trap-bar deadlift. Think about it: You're moving dead weight like the deadlift, using many of the same muscles.
Here's powerlifter Big Ed McKelvey performing the dead squat. For extra difficulty, he's got elastic bands on the bar as well, one of my other favorite ways to solve squat sticking points.
Training Tips: Like dead benches, I have my clients do this only for single repetitions, starting in the bottom position, not the top. If you have a safety squat bar, I recommend using it for this movement. If not, a straight barbell will suffice.
If you're training to specifically increase your sumo deadlift, perform the movement with your sumo stance using the same hip angle, knee angle, and foot placement as with your sumo deadlift.
Muscle-Building Best Sellers
3. Sticking-Point-Specific Isometrics
When performed properly, isometrics have a very localized training effect; that is, they'll improve your strength in the angle at which you train them. If you do them targeting your sticking point, that's the only point in the range of motion, plus or minus a few degrees, they'll be of value. That why they're embraced by many of my world-record-setting clients.
By training in a relatively weak region, you're overloading it, and your central nervous system is being programmed to become aggressive right at that spot. That's why I've found this method to be superior to a static hold, in which you simply hold the bar in that position without pushing as hard as you can. Moreover, that maximum force at that exact spot is maintained for a helluva lot longer than if you were just holding the weight there with a static hold.
Here's elite bencher Peter Edgette demonstrating isometrics on the bench press:
Training Tips: While isometrics can successfully be used to bring up a sticking point in any movement, the biggest carryover my athletes and myself have experienced thus far are with bench presses, overhead presses, and deadlifts. In theory, they should work for any movement— even biceps curls. Don't use isometrics for more than 6-8 weeks at a time, though; their effectiveness will wear off.
Set the safeties in a power rack at the exact position in the range of motion you're targeting. When the bar is atop the safeties, load up the weight using more than your single-rep max; the bar isn't going anywhere. Get inside the power rack, and push or pull the barbell as hard as you can for 5-6 seconds. Performing isometrics in this manner will strengthen the range of motion within 15 degrees of the joint angle you're training. By matching it up with your sticking point, you'll systematically exterminate it. Alternately, you can use an unloaded bar under the safeties and push as hard as you can upward against them.
Perform these isometrics for up to 3 sets per sticking point, and no more than 6 sets total per workout. Then, wait 2-3 minutes, and perform the full-ROM version of the exercise for a single set with a weight you can handle for 10 reps with intention of moving the barbell as fast as possible. This insures transference to the movement you're training, and you'll be more explosive with full-range-of-motion sets because of post-activation potentiation. In the words of the late coach Yuri Verkhoshansky, "[Using PAP] is like lifting a half of a can of water when you think it's full."
4. Farmer's Walk
Some people classify farmer's walks as a grip test, but that's really just the start of what they do. Anything that requires explosive power, athleticism, grip strength, overall limit strength, and core strength will benefit from the farmer's walk. So pop that BOSU ball, and I'll introduce you to some real functional training.
I have yet to meet someone great at the farmer's walk who didn't also have an intimidating set of traps that would scare would-be attackers at the gas station at 3 a.m. Furthermore, core stability, leg strength, calf strength, and the strength of the entire posterior chain—the muscles on the back side of the body—get worked. Nothing is more functional than picking up heavy stuff and having to move it.
Here's Josh Bryant carrying 350 pounds in each hand for 50 feet:
Training Tips: In strongman competitions and training centers, specialized farmer's-walk implements are the norm. No access to handles? No problem! Grab a pair of weighted dumbbells, or even barbells will work. Go to an area with plenty of open space, and set the implements parallel to each other on the floor. The handles should be approximately shoulder-width apart so you're able to stand between them to lift them.
Reach down, grab each handle, and stand back up with the implements at your sides. Begin to walk forward with short, quick steps; as you become comfortable with the weight, you can begin to move faster and lengthen steps.
A good starting point with farmer's walks is 3-4 sets of 50-100 feet. If you've never done these before, a good starting weight is 60 percent of your deadlift max. So, if you can deadlift 300 pounds, you'd start with 180 pounds, or 90 pounds in each hand. Once you get the hang of the movement, you'll be able to progress rapidly.
This is a strength article, but I know some of our readers want to grow huge traps. If that's your objective, start adding farmer's walks of 50 feet, then shrugging the weights without dropping them for 15 reps. If grip is the limiting factor, wear straps. The objective is growth.
5. Yoke Walk
The squat and deadlift are tough to beat when it comes to head-to-toe muscle-fiber recruitment, but the yoke walk is in a class by itself. It will strengthen your squat, your dead, and strengthen you, period.
Once you get the hang of the yoke, you'll be using a lot more weight than you can squat. Because you're putting your body under a much heavier load than it's accustomed to and then moving forward, you can invoke a stimulus that's literally impossible to duplicate with any other movement.
The yoke will simultaneously build strength, muscular endurance, core stability, and explosive power while working virtually every muscle in the body. It'll also make heavy squats feel a whole lot lighter!
Here's strongman Matt Mills demonstrating the yoke walk:
Training Tips: Set the yoke cross bar to the appropriate height, at approximately a quarter squat. Eventually, you may prefer it higher, but this is a good starting point. Experiment with different hand placements, and find one that allows you to get tight and build a shelf with your upper back for the yoke to rest on.
Like squatting, get under the bar, take in big air, get as tight as possible, and pick up the yoke. Once you're standing up, let the weight settle before stepping forward. Taking small, quick steps, walk as fast as you can for the desired distance; 2-3 sets of 30 feet is a great starting point.
Maintain tightness not only for safety, but to limit any side-to-side or up-and-down movement. Even a little movement makes the yoke swing, which in the best-case scenario slows you down, and in the worst-case scenario causes injury. Take small breaths as you go; larger ones will cause you to lose core tightness and stability.