
As a strength coach and co-founder of my own facility, I have the luxury of living in a strength and conditioning utopia. I scrutinize every trainee, program, set, and rep under the roof of Cressey Performance, and it's my job to make them better. I always place a premium on technique—especially when it comes to more "coaching intensive" movements like the squat.
I often joke that half my job as a strength coach is to apply the brakes for people and force them to take a step back so they learn to lift correctly. After all, one repeated squatting mistake or wrong move can hinder consistent progress in the gym, or worse, cause your spine to crumble like Jenga blocks.
When I travel and train at a commercial gym, I can't help but observe other people. I'm a coach; it's second nature, like riding a bike, crushing some protein after a training session, or forgetting to put the toilet seat down, much to my girlfriend's dismay. I see plenty of people doing things right—focusing on compound movements, actually squatting in the squat rack—but I can't help but notice the same common mistakes rearing their ugly heads time and time again.
It's hard to get bigger, faster, and stronger if you're constantly banged up, so it's my goal to ensure my clients' long-term success with limited trips to the chiropractor. Check out the brief, albeit not exhaustive, list of mistakes I highlight and correct below to improve your squat safety, strength, and overall performance.
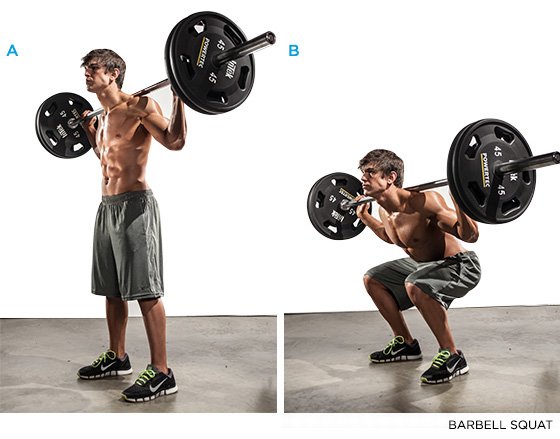
Your initial squat setup will literally make or break any set. Unfortunately, for many lifters, they haphazardly approach the bar, grab it, and begin their set without much thought or attention to detail. This is why many fail to make any significant progress, or more to the point, end up injured. Taking time to properly set up will provide more stability for the spine, keep the body "tight," prevent and limit energy leaks, and result in more total weight lifted down the road.
A plethora of coaching cues can be thrown in here, but I'll limit them to a few universal points that help most people:
- When approaching the bar, duck underneath and be sure to squeeze your shoulder blades together hard. This will provide a "shelf" for the bar to sit on.
- Squeeze the bar as hard as you can (try to make it melt in your hands) while simultaneously pulling down. Doing so will activate the lats and thoraco-lumbar fascia, which are key spinal stabilizers.
- Take a deep breath, unload the bar, and take two steps back—that's it. You're squatting, not making the trek to Mordor, Frodo.
- From there, take another deep breath, pull down on the bar to lock it in, point your elbows toward the floor, keep your chin tucked—don't look up!—and begin your descent.
Maintaining "Tightness" While Squatting
Watch The Video - 02:33
Utilizing more of a hip hinge pattern—initiating the descent by pushing the hips back rather than knees forward—will work wonders to alleviate common knee pain when squatting.
I could put on my nerd cap and start talking biomechanics, but I'll save you the boredom and just say that, by doing so, you maintain more of a vertical shin angle, which will be much more knee-friendly in the grand scheme.
Furthermore, the hip hinge will engage the hamstrings and glutes to a higher degree, which are generally woefully weak and underdeveloped. Beginning with the hip hinge also makes it easier to attain proper depth, as it forces the lifter to push his or her knees out to "open up" the hips more.
Understandably, like learning the tango, the hip hinge is going to feel foreign for many people, and it may take time to "groove" the proper pattern.
One drill to implement, either as part of a dynamic warm-up or just before squatting, is the dowel rod hip hinge drill.
Dowel Rod Hip Hinge Patterning
Watch The Video - 00:14
The simplicity of the drill is ingenious. Using your garden-variety dowel, place it on your backside to ensure there will be three points of contact: the back of the head, between the shoulder blades, and the sacrum—the posterior section of your pelvis.
From there, simply hinge back with soft knees (not locked) and push your hips back. If at any point you lose contact with the dowel rod, you know you're doing it wrong, because the loss of contact reveals that you're not maintaining proper spinal position throughout the movement.
The end goal is to be able to emulate the same pattern with the barbell on your back.
This is arguably the biggest mistake of all. If you don't suffer from past or present significant injuries or dysfunctions like anterior cruciate ligament (ACL) tears, patellofemoral pain, or femoral acetabular impingement, there's no excuse not to squat to ample depth. Ample depth is achieved when the front surface of the thigh goes below the knee joint.
Watch most people squat and you'll notice they don't come remotely close. Yes, it's uncanny how many people brag about their 300-plus-pound squat with a quarter range of motion.
I'll concede that there's a time and place for quarter squats, but if you 25-percent squat 100 percent of the time, it's just lame—like guys who wear Polo shirts with the collar popped. Knock that collar-popping crap off, fellas.
Almost always, box squats will provide the best fix for two major reasons:
- They keep people honest and force them to learn what proper depth feels like. For the record, it's often much lower than what most are used to.
Note: This will most likely mean checking your ego at the rack and taking some weight off the bar. Yeah, it sucks—like watching The Notebook to compensate for leaving the toilet seat up—but it will pay huge long-term dividends.
- Box squats also help people learn more of a hip hinge pattern—sitting back and pushing the knees out—that engages the hamstrings and glutes to a greater degree, which is critical to building an impressive squat.
Check out the video below, which goes into more depth—pun intended—on box squat technique.
Box Squat vs. Squat to Box
Watch The Video - 06:18